TENNIS UNIT PLAN FOR GRADE 10 STUDENTS
By: Michael Sopow and Clayton Howe
                    
(www.tennisone.com)              (www.havergal.ca)                 (www.tenniscanada.com)      

TABLE OF CONTENTS
1. Philosophy
2. Entry Level and Exit Outcomes
3. Psychomotor Outcomes
4. Cognitive Outcomes
5. Affective/Social Outcomes
6. Content Analysis
7. Teaching Styles
8. Warm-ups
9. Description of tasks and activities
10. Block Plan
11. Assessment Procedures
12. Safety Considerations
13. Managerial Routines
14. Lesson Plans
15. Sample Task Card
16. Useful Links
17. References

Unit:  Tennis
Grade:  10
Class:  Coed (30 students)

PHILOSOPHY:    
    We believe PE should fuel ones’ desire to remain active throughout life.  While also promoting the independent thought of its students.  By including fun and interesting projects, and instruction, in tennis we hope to accomplish these goals.

ENTRY LEVEL AND EXIT OUTCOMES:
    For this unit we will assume that only a hand full of students will have played tennis on more than an inconsistent, recreational level.  However, we do expect that all of the students will have had some instruction in badminton.  Since the tactics and general motor programs used in badminton are similar to those used in tennis, we expect a rapid transfer of learning.  Therefore, by the end of the unit we hope the students will be able to perform each task with a great deal of consistency.  As well as, have the tactical and general knowledge base to be able to participate in a match with one’s peers, or at least have gained the knowledge and ability to be able to watch and play with greater appreciation.

PSYCHOMOTOR OUTCOMES:
1.     Students will be able to perform the ready position.
2.     Students will be able to demonstrate the forehand grip.
3.     Students will be able to consistently use the varied forehand strokes (Flat, Topspin and Slice)
4.     Students will be able to consistently use the varied backhand strokes (Flat, Topspin and Slice)
5.     Students will be able to continue a rally using all types of ground strokes (Backhand and Forehand)
6.     Students will demonstrate an ability to consistently hit the ball to the strategic areas of the court (Deep Corner’s, etc)
7.     Students will be able to effectively use the volley, in a game, while demonstrating proper technique
8.     Students will be able to accurately, and consistently, serve to both of the service courts

COGNITIVE OUTCOMES:
1.     Students will show an understanding of the basic concepts in tennis.
2.     Students will demonstrate an ability to keep score.
3.     Students will show a basic understanding of the rules of tennis.
4.     Students will show their understanding of the court dimensions for each type of play, in tennis (Singles vs Doubles Court).
5.     Students will demonstrate their knowledge of the basic strategies and tactics used in tennis.
6.     Students will be able to describe several cues for each of the skills learned in class.

AFFECTIVE/SOCIAL OUTCOMES:
1.     Students will demonstrate sportsmanship throughout the course.
2.     Students will show they can help other students develop better skills in a peer teaching setting.
3.     Students will demonstrate responsibility through completion of their group appointed tasks.
4.     Students will work effectively in group situations.
5.     Students will learn to cooperate in a positive atmosphere.
6.     Students will gain social interaction with peers.
7.     Students gain an appreciation for tennis through class projects.

CONTENT ANALYSIS:

Content will be broken down progressively for tactical understanding and skill development (Hopper, 1998).  The following principles of play for net/wall games will be progressively followed, (1) Consistency, (2) Positioning and placement, and (3) Spin and power.  The relationship of skills to tactics will be basic skills to play, then from game play to skill development and then back to more challenging game play and so on (Thorpe and Bunker, 1989).  Skills will be broken down into off-the-ball movements and on-the-ball skills (Griffin, Mitchell & Oslin, 1997).

Tactical Problem
On-the-Ball-Skills
Off-the-Ball-Skills
Consistency
 - Keep the ball in play
 - Force opposition to make mistake

 - Toss and serve
 - Contact point
 - Power and control
 - Effective forehand,
 backhand, and volley

 - Ready position
 - Recover/relocate to
 target area
 - Prepare early

Placement and Positioning
 - Hitting to pressing zones
 - Setting up opponent
 - Recovering and relocating to target area

 - Grips
 - Forehand, backhand,
 serve, and volley

 - Effective movement
 patterns, split-step, push
 off outside foot, staying
 low
 - Recover/relocate
 - Ready position

Spin and Power
 - Using spin and power to keep opponent
 guessing
 - Reduce time for opponent to prepare

 - Topspin (forehand,
 backhand)
 - Vary speeds on strokes
 - Vary power on serve
 - Flat/slice serves
 - Backspin on forehand,
 and backhand

 - Prepare early
 - Recover/relocate to
 target area


TEACHING STYLES USED IN UNIT:

The teaching styles that this unit will include consist of: command, practice, reciprocal, self-check, and guided discovery.  The guided discovery style will mainly be used at the beginning of the lesson to stimulate the students and get them thinking about the task at hand.  The practice style will be the most common style used in the unit.  Brief descriptions of the styles used in this unit are given below.

Command Style
    In the command style the teacher makes all of the decisions.  The teacher is either giving the students direct instructions to follow or he/she is leading the class.  The students perform and follow the teacher’s directions at the same time.  Therefore the teacher gives out a command signal and the students perform accordingly. 
    The command style will be used when uniformity of the class is required and when safety is a major factor.  For these reasons the command style will be used during the serving lesson.   
Strengths:
-    quick way to introduce a task
-    safety
Weaknesses:
-    little teacher/student interaction
-    teacher has no free time to tend to individual needs

Practice Style
    In the practice style the learners begin to make some decisions.  The teacher still determines the task and is the primary source of feedback, but the students now practice at their own level and time.  The teacher provides a demonstration of the task/skill, which is followed by individual or small group practice.
    The practice style like the command style is used when there is a fixed model of performance.  Unlike the command style though the practice style allows individual practice and will be used when it is likely that there will be a large range for learning the skill.  The practice style also allows the teacher to give individual feedback to the students.  The practice style will be the style used most during this unit, it can be seen in the forehand and backhand lessons.
Strengths:
-    students are able to practice at their own level
-    teacher is able to give individual feedback
Weaknesses:
-    students ability to do and stay on task
-    students not challenging themselves

Reciprocal Style:
    In the reciprocal style learners work in partners, with one student acting as the observer and the other acting as the performer.  The observer provides the performer with performance feedback by following a criteria sheet developed by the teacher.  The teacher also provides a demonstration of the skill and helps the observer provide feedback.  The reciprocal style provides the students with continuous feedback and also allows the students to learn how to give and receive feedback. 
    The reciprocal style will be used when the students start to feel more comfortable with each other.   The reciprocal style will also be used when there is benefit from continuous feedback and when there is a strong social aspect.  The reciprocal style will be used in some of the movement drills in this unit.
Strengths:
-    continuous and immediate feedback
-    the student observer gets practice analyzing skills and in giving feedback
-    no pressure from teacher observation
-    peer interaction
-    learn how to provide and receive feedback
-    develops social bonds
Weaknesses:
-    partners are not getting along
-    partners are not willing to give feedback

Self Check
    In the self check style the teacher still determines the task and the criteria, while the learner performs the task and provides them self with feedback by referring to a self check sheet developed by the teacher.
    In the self check style the students are able to work independently.  In this unit the self check style will be used to refine and improve the students skills, after they have already grasps the major aspects of the task. 
Strengths:
-    students can work independently of each other
-    major step towards self-reliance
Weaknesses:
-    students staying on task
-    students not challenging themselves

Inclusion
    For the inclusion style the teacher determines multiple levels of a task or multiple tasks for the students to perform.  The learners than decide at what level they will start at and how fast they will progress.  The learners are still providing themselves with feedback by referring to a criteria sheet made by the teacher.
    The inclusion style will be used to help the students improve a certain part of their tennis game.  Their will be different stations with criteria sheets set up for the students to choose from when the inclusion style is being used.
Strengths:
-    participation, everyone can get involved
-    students choose their level and speed progress
Weaknesses:
-    effective demos
-    students not challenging themselves, not progressing

Guided Discovery
    In the guided discovery style the teacher asks a series of questions that lead the students to discover the predetermined concept.  The questions asked and the sequencing of the questions is very important for this style.  The guided discovery style is most commonly used at the beginning of a lesson, to stimulate the students and to get them thinking about the task.
Strengths:
-    students start to problem solve
-    students are more likely to remember the particular aspect of the skill when they come up with the answer themselves
-    increases confidence and motivation because the questions lead them to the correct answer
Weaknesses:
-    students might not come up with their own answers, wait for someone else to respond first

WARM-UPS:

1. Four Corners
   -       Students get into partners, one stands in the middle of the court with a racket, the other at the front of the net
   -       Partner at the front of the net points to the corners of the court, the partner with the racket must move to whichever corner
   -       Top corners – do a volley lunge at the net, back corners – do a backhand or forehand stroke
   -       Switch partners around after 30 seconds
 
2.  Hit it over (Hawley Anderson - www.educ.uvic.ca/Faculty/thopper/PE352/index.html)
   -       Students are placed into appropriately sized groups (depends on number of courts available)
   -       Within their groups, students line up along their base line facing the net
   -       A bucket of balls is at the service line in front of each team
   -       Each student, within the group, runs up and picks up a ball; he/she then hits it over the net using a designated stroke
   -       The first team with all the balls over the net wins

3. Shadow Tag
   -    Students are in partners (numbered one and two)
   -    One partner is “it” and the other partner is the “runner”
   -    The runner gets a five steamboat head start to get away
   -    When the runner gets tagged, he/she is now “it” and gives the other partner a five steamboat head start
   -    However, on the signal/whistle the partner’s change roles (runner now it, and vice versa)

4.  Pack Rat (Hawley Anderson - www.educ.uvic.ca/Faculty/thopper/PE352/index.html)
   -       Students have a home base consisting of a hula-hoop placed in the area of their choice, and tennis balls are spread out all over the court
-     Students have one minute to pick up as many tennis balls as they can (bending with their knees) and return them to their home base.
   -       You can add rules, e.g. can only pick up one tennis ball at a time, you can’t take tennis balls from other people

5. Find a cone
   -       Each student gets a cone and places it somewhere within a designated area
   -       When the teacher says “go” the students run to find another cone; once at a cone they must do a split step over it , and then continue to another and do the same thing
   -       2 people can’t be at the same cone
   -       When teacher says stop everyone must get to a cone
   -       Work on getting low, quick changes of direction, agility etc…

6. Window Game
   -       Students are in partners
   -       Partners set up two cones ~1m apart
   -       The students are not allowed to reach in between the cones (it is supposed to be a window - hence the name)
   -       Partners start by facing each other, and then one partner moves in any direction around the cones, and the other has to try to mirror the actions (do same actions opposite of their partner)
   -       After awhile change to a tag game where one partner is “it” and tries to shuffle sideways around cones to tag the other person

7. Wall Ball (Squash)
   -       Students get into pairs and scatter around the gym with a section of wall
   -       Students can use forehand or backhand or both to hit the ball
   -       One partner hit’s the ball against a wall, the other then does the same
   -       The partners try to see how many consistent rallies they can get in a row
   -       If they loose control of the ball they have to start at zero and work their way up again
   -       Work on consistency, racket control, moving to the ball, and anticipating the movement of the ball
   -       Change rules so have no, one, or two bounces after hits the wall

8. Short Court
   -       Students are in partners in a area designated (service area)
   -       Each student has a racket, and each pair has a ball
   -       The pairs play a mini game of tennis in the smaller court, starting by serving the ball over net
   -       The teacher will call out a certain type of stroke and the pairs will have to play with that stroke until the teacher yells another one
   -       If there is a problem with space, some pairs can increase the area to a half court
   -       You can vary this by having groups of four play two on two within both service areas

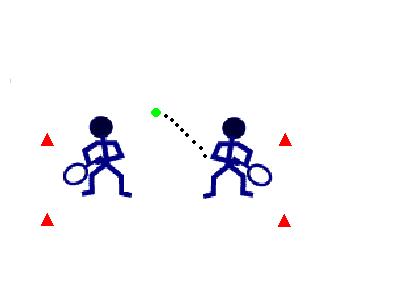
9. The Line Game
   -       Students get into partners and place 2 cones on a line a certain distance apart (~1m), each set of partners has a ball
   -       Partners face each other across the line, and bounce the ball to each other
   -       The ball must bounce on your side of the line first before it crosses on to your partners side
   -       Partners catch the ball and bounce it back
   -       Keep it going for awhile and then let students make up their own game, and rules (how to score points, how far apart the cones will be, how to start the game)

10. Tennis Ball Tag
   -       Students are in a designated area
   -       One player has a tennis ball in their hand and can pass the ball to other students at any time
   -       The person who is “it” chases who ever doesn’t have the ball
   -       If someone is tagged they stand in place until the ball is tossed to them, then they are free to continue
   -       Some variation include having more than one “it” person, having more than one ball

 11. Toss the ball
   -    Students pair up and number themselves one and two
   -    Partner one gets a tennis ball and partner two finds a space for the partners’
   -    The person with the tennis ball tosses it in the air, away from their partner.
   -    The other partner tries anticipate where their partner will toss the ball, and move three and catch the ball.  He/she then tries to toss the ball away from their partner.

12.  Ready (Hawley Anderson - www.educ.uvic.ca/Faculty/thopper/PE352/index.html)
   -       The class is spread out in front of the teacher (everyone facing the teacher)
   -       The teacher says different commands and does actions and the students follow
   -       e.g. teacher yells ‘ready’ gets into the ready position, and runs in place while the class follows until the teacher says, and does the next command
   -       Commands could be: forehand volley, forehand, backhand, ready, etc

DISCRIPTION OF TASKS AND ACTIVITIES:

Ready Position:
-    Allows the player to react and move quickly
-    Player is facing net with feet shoulder width apart
-    Weight is on balls of feet
-    Knees are bent
-    Arms are slightly bent, with the racket in front of you at waist height
-    In center of target area

-    Cues: a) bend at knees, b) weight on balls of feet, c) ready for action

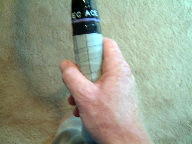
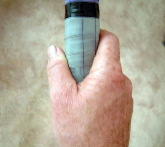
Forehand Grip:
-    Shake hands with the racket
-    “V” shape is made between 1st finger and thumb

-    Cues: a) shake hands with racket

(web.uvic.ca/~thopper)

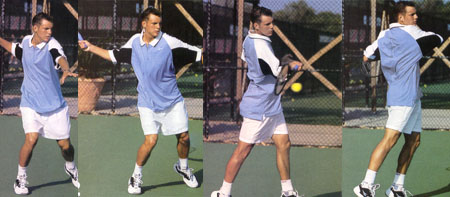
Forehand Stroke:
1.    Preliminary movements: - ready position
-    Forehand grip
-    Prepare early
2.    Back swing: - Pivot on non racket foot
-    Bring racket back, move whole arm (wrist is locked)
-    Weight on back foot
3.    Force producing movements: - weight transfer, back foot to front foot
-    Racket moves from low to high
4.    Critical instant: - Contact with ball is approximately in line with front foot
-    Contact ball at waist level
5.    Follow through: - Racket continues to rise across body, up towards opposite shoulder
-    Pivot back and return to ready position

-    Cues: a) prepare early, b) low to high c) follow through

(www.revolutionarytennis.com)
   
(www.revolutionarytennis.com)

(www.revolutionarytennis.com)

Backhand Grip:
-    From forehand grip slide hand down so that the second knuckle of the thumb is on the 6th bevel

(web.uvic.ca/~thopper)
  
Backhand Stoke:
1.    Preliminary movements: - ready position
-    Forehand grip
-    Prepare early
2.    Back swing: - Switch to backhand grip
-    Pivot on racket foot, so racket side is facing the net
-    Bring the racket back so back is almost facing net
-    Weight on back foot
3.    Force producing movements: - Weight transfer
-    Sweep racket forward
4.    Critical instant: - Contact with ball is ahead of the front foot
-    Contact just below waist level
5.    Follow through: - Racket continues to rise, up above head height
-    Return to ready position

- Cues: a) racket side to net, b) transfer weight, c) follow through out, across, and up

(www.revolutionarytennis.com)

Serve:
1.    Preliminary movement: - Standing parallel to court, feet shoulder width apart
-    Use forehand grip
2.    Back swing: - Let both arms fall
-    Bend at knees
-    Bring feet together
-    Toss ball high and slightly in front of you   
-    Bring racket up behind head
-    Moves are done together and smoothly
3.    Force producing movements: - Extension of body
-    Extension of arm
-    Snapping of wrist
4.    Critical Point: - Contact should be made at highest point possible
-    Contact should be made slightly in front of your body
5.    Follow through: - Arm sweeps out and downward across body
-    Slightly enter the court

6.    Cues: a) la, de, da b) like baseball throw c) scratch your back then reach high

(www.tennisone.com)

Overhead Smash:
1.    Preliminary Movements: - Ready position
2.    Back swing: - Step back with racket foot
-    Reach for ball with non racket hand
-    Weight is on back foot
-    Racket is behind head, like for serving
3.    Force producing movements: - Weight transfer from back foot to front foot
-    Extension of racket arm and snapping of wrist
4.    Critical instant: - Make contact in front of your body
-    Make contact at highest point
5.    Follow through: - Is just like serve
-    Racket sweeps down and across the body

-    Cues: a) Reach for ball b) Extend c) Keep eye on ball

Volley:
1.    Preliminary movements: - Ready position (except hold racket higher)
2.    Back swing: - The back swing is very short
-    Should not go farther back then body
-    Racket head should be kept higher than handle
3.    Force producing movements: - Racket is moved straight forward into the ball
-    Quick rotation of the shoulders
4.    Critical instant: - Ball is met in front of the body
5.    Follow through: - There is also a shorter follow through then the other strokes
-    Arm should only straighten
-    Back into read position

-    Cues: a) quick feet b) short back swing c) block the ball
                               
(www.tennisone.com)                   (www.tennisone.com)

Line Game:
1.    Rules: - Ball must bounce on own side first
-    Ball must bounce in between cones
-    Co-operate-compete
2.    Cues: - Anticipate where ball is going to go
-    Stay low
-    Recover/relocate
3.    Organization: - Get students into partners
-    Number 1 and 2 (or some other method), # 1’s go get equipment, # 2’s go find a space
-    Have a variety of balls to fit all learning abilities
-    Start with hands and then incorporate rackets/paddles
-    Switch partners after awhile
-    Ask questions about space, time, positioning.  ie. Where do you go after you hit the ball?  How can you give your partner more time to play the ball?


Keep it up game:
1.    Rules: - Must alternate hits/throws with a partner
-    Stay in space
-    Hit above head height
-    Object cannot touch the ground
2.    Cues: - Move to target space
-    Anticipate
-    Stay low
3.    Organization: - Organize area into quadrants
-    Get students into partners
-    Number 1 and 2 (or some other method), # 1’s go get equipment, # 2’s go find a space
-    Have a variety of equipment (ie. Balls, shuttlecocks, bean bags) to fit all learning abilities
-    Start with hands and then incorporate rackets/paddles
-    Switch partners after awhile
-    Ask tactical questions

Triangle Beanbag:
1.    Rules: - Partner calls out number you go to corresponding position
-    If a beanbag is at that spot bring it back
-    If there is no bean bag bring one with you
2.    Cues: - Stay low
-    Anticipate number
-    Keep head up
3. Organization: - Get students into partners
-    Number 1 and 2 (or some other method), # 1’s go get equipment, # 2’s go find a space
-    Use beanbags

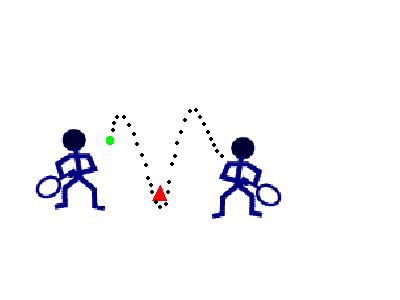
Castle Game:
1.    Rules: - Ball must bounce once
-    Ball must be hit above head height
-    Alternate hits with partner
-    Aim for cone
2.    Cues: - Bend at knees
-    Move into target area
-    Stay low
4.    3. Organization: - Get students into partners
-    Number 1 and 2 (or some other method), # 1’s go get equipment, # 2’s go find a space
-    Have a variety of balls to fit all learning abilities
-    Start with hands and then incorporate rackets/paddles
-    Switch partners after awhile
-    Ask tactical questions

Shadow drills:
1.    Rules: - One person leads while the other person follows
-    Co-operate®compete
2.    Cues: - Stay low
-    Push off outside foot
3.    Organization: - Get into partners
-    Number 1 and 2, # 1’s start by leading
-    Get the students to critique each others movements

Backhand “brush” progression:
1.    Rules: - One person is tossing ball lightly just over net
-    Other person is hitting ball back
-    Try and put spin on shots
2.    Cues: - Bend at the knees
-    Hit ball out in front
-    Hit ball as it falls, after bounce
3. Organization: - Get students into partners
-    Number 1 and 2 (or some other method), # 1’s go get equipment, # 2’s go find a space near the net
-    Switch partners around, so both get a chance to hit
 

Dink game:
1.    Rules: - Ball cannot hit the ground
-    Can only hit the ball up
-    Must hit the ball within the area
2.    Cues: - Step with proper foot
-    Hit up for time
-    Return to ready position
3. Organization: - Get students into partners
-    Number 1 and 2 (or some other method), # 1’s go get equipment, # 2’s go find a space near the net
-    Use serving squares for court


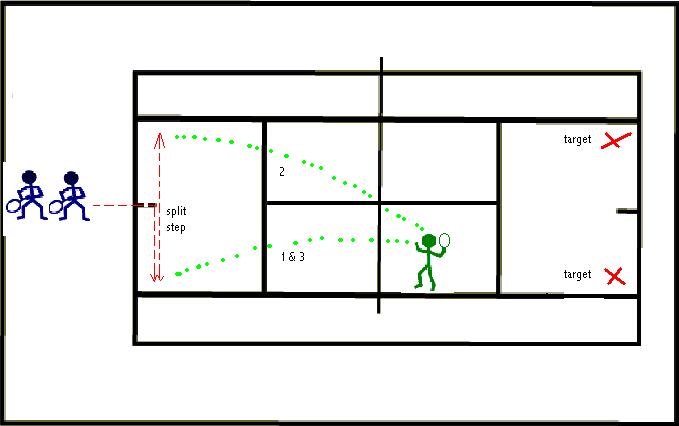
3 ball toss:
1.    Rules: - Try and keep all balls in play
-    Each person gets 3 balls then rotates
-    One person at a time
2.    Cues: - Get their early
-    Stay low
-    Hit pressing zones
3.    Organization: - Get students into groups of 4/5
-    Use a full court
-    One person has all the balls on one side, while the others line up behind the baseline on the other side of the court
-    The feeder hits 3 balls, one up the line, one cross court, and back up the line
-    The first person in line runs up to the baseline does a split step then goes to hit the balls
-    Then students should rotate around
 

Serving Drill:
1.    Rules: - Try to get ball into service square
-    Do not step on the line
-    Take turns with partner
2.    Cues: - Extend
-    La, De, Da
-    Follow through
3. Organization: - Get students into partners
-    Number 1 and 2 (or some other method), # 1’s go get equipment, # 2’s go find a space near the net
-    Partners go to opposite baselines
-    Take turns serving it to each other
-    Can start at the edge of the service box and then work your way back
 

Volley Drills:
1.    Rules: - Play ball into court
-    One person at a time
2.    Cues: - Hit to pressing zones
-    Move quickly
-    Short “punch”
3.    Organization: - Groups of 4/5, get one person to be the feeder and the rest to line up behind the baseline
-    First person in line runs to the net, does a split step moves quickly across court and volleys the ball from the feeder
-    Rotate around
-    Use the whole court
 

Over space game:
1.    Rules: - Ball must be hit over area
-    Ball must bounce once on your side
-    Ball must be hit above shoulder height
2.    Cues: - Anticipate
-    Stay low
-    Recover/relocate
3. Organization: - Get students into partners
-    Number 1 and 2 (or some other method), # 1’s go get equipment, # 2’s go find a space
-    Have a variety of balls to fit all learning abilities
-    Use cones to make the space, playing area
-    Show them how to make the court, so then they can go make their own
-    Switch up partners
 
King/Queen of court:
1.    Rules: - Challengers must get 3 points to dethrone the King/Queen
-    If the king gets a point you go to the back of the line
-    Must serve from behind the service box end line
2.    Cues: - Recover/relocate
-    Prepare early
-    Stay low
3.    Organization: - In groups of at least 4, pick one person to be the King/Queen
-    Take turns playing King/Queen
-    Use narrow and long court


Group Tournament:
1.    Rules: - At deuce it is next point wins
-    Serve straight across
-    Alternate serving
2.    Cues: - Hit to pressing zones
-    Anticipate
-    Recover/relocate
3.    Organization: - Get class into groups of 4
-    Try and make groups fairly even
-    Have singles games on half courts
-    Have one court for practice (three ball toss, etc)
 

BLOCK PLAN:

LESSON
REVIEW SKILLS/CONCEPTS
NEW SKILLS/CONCEPTS
MAJOR TEACHING POINTS
ORGANIZATION / TEACHING STYLES
One


1. Ready position
2. Proper movement:
3. Positioning
4. Forehand Grip

Ready Position:
 - balls of feet
 - bend at knees
 - racket in front,
proper grip
Proper Movement:
 - push off outside leg
 - stay low
Positioning:
 - Where do you go after
you hit the ball?
Forehand Grip:
 - shake hands with
racket
 - 'V' shape
Tactical Questions:
 - How can you keep the
rally going?
 - How can you give
yourself more time to
make the shot?

1. Warm-up: Line game
 (Guided Discovery)
2. Keep it up game
3. Demo of grip and ready
 position
4. Shadow drill with partner
 (Practice)
5. Rally with partner:
 - moving to open space
 - creating space
 - efficient movement

Two
1. Ready position,
and grip
2. Positioning and
movement

1. Ball control
2. Forehand stroke

Ball Control:
 - Low body position
 - Contact point,
timing
Forehand stroke:
 - prepare early
 - transfer weight
 - follow through, low-high

1. Warm-up: Castle game
 (Guided Discovery)
2. Demo of forehand
3. Over space game
 (Practice)
4. Wall drills: hitting to self
 against wall, consistency
 (Practice)
5. Mini-game with partner
 (Practice)

Three
1. Positioning
2. Forehand stroke

1. Backhand grip
2. Backhand stroke

Backhand grip:
 - from forehand grip
 slide hand over so 2nd
 thumb knuckle is on 6th
 bevel
Backhand stroke:
 - racket side to net
 - transfer weight
 - follow through, out,
 across, and up

1. Warm-up: Triangle
 beanbag game

 (Reciprocal)
2. Demo of backhand grip
 and stroke
3. Backhand brush
 progression (Practice)
4. Rally with partner
 (Practice)
5. King/Queen of Court

Four
1. Ground strokes
 

1. Serve
1. Serve: - side stance
 - toss
 - la, de, da
 - reach high
 - like baseball throw

1. Warm-up:
2. Demo of serve
3. Serving technique
 (Command)
4. Serving drill (Practice
5. Mini-game with partner

Five
1. Movement and
 positioning

1. Game tactics /
strategies
2. Bringing skills
together
3. Scoring and rules

1. Hitting to pressing
 zones
2. Setting opponent up
3. Winning the point
4. Assessment

1. Warm-up: Stations
 - different activities at dif.
 levels (Inclusion)
2. 3 Ball toss (Practice)
3. Partner Rally: ask
 tactical questions that lead
them to develop a singles
strategy (Guided discovery)
4. Group Tournament

Six
1. Serve
1. Overhead smash
 

1. Overhead smash:
 - similar to serve
 - reach for ball
 - extend
 - hit to corner of service box
 

1. Warm-up: Line tag
2. Demo of Overhead smash
3. Practice with partner, one
 person feeding (Reciprocal)
4. Rally with partner
 (Practice)
5. King/Queen of court

Seven
1. Overhead smash
 and serve
2. Positioning and
 movement

1. Volleying
1. Volleying:
 - short swings
 - quick, efficient
 movements
 - anticipate

1. Warm-up: Dink game
 (Guided Discovery)
2. Review of serve
3. Demo of volley
4. Volley drills (Practice)
5. Serve and Volley
6. Group Tournament

Eight
1. Review skills:
forehand, backhands,
serve, and volleys

1. Setting up your
 opponent

1. Playing to pressing
 zones
2. Relocating to target
 area

1. Warm-up: Lunges
 - In partners, one person is
 tossing ball, other lunges to
 grab it (Practice)
2. Station work: - different
stations set up with criteria
sheets (Self check)
3. King/Queen of court
4. Set up class tournament
for next class

Nine
1. Tennis etiquette
1. Trip to Oak Bay
bubble
2. Mini-Tournament


1. Consistency
2. Game-play

1. Partner rallying (Practice)
2. Class tournament, one
court left open for practice, 3 ball toss, etc.

Ten

1. Mini-Tournament
2. Performance
assessment

1. Observe from a
 distance, do not put
 students under any
added pressure

1. Warm-up: Partner
 rallying (Practice)
2. Class Tournament


ASSESSEMENT PROCEDURES:

1.    Cognitive – 30%
15% - A written assignment on an aspect of interest within tennis (See Example Assignment Sheet)

     15% - A written exam will be given covering the rules, scoring, strategies etc…

2.    Psychomotor – 50%
    15% - Skill Level.  The students’ will have the teacher mark off their skill level on the task station days.  If the student reaches the sixth level they will receive a perfect mark in that skill. (See Example Task Sheet)
   
    25% - Improvement.  The students’ skill level will be marked off on the first task day, and then retaken later in the course.  This mark will be based on the students’ improvement in skill level from the first to the last task day.
   
    10% - Game Play.  This mark will be based on the teacher’s observations of the students play during game days.
   
3.    Affective – 20%
10% - Based on the students’ ability to complete their organized tasks.  The class will be organized into groups according to the attendance roster.  Each group will be given the task of putting out and cleaning up equipment for their assigned days.

10% - Will be based on attendance, having appropriate attire, actively participating in class, and the showing of sportsmanship to ones’ fellow students.

SAFETY CONSIDERATIONS:

1.    Make sure appropriate footwear is worn and properly secured.
2.    Ensure students are wearing proper clothes.
3.    Make sure the court and the surrounding area is free from debris (eg. Tennis balls, Glass, etc.).
4.    Ensure students are properly spaced so they don’t hit the each other when practicing.
5.    Enforce rules about the proper racket use, any misuse of rackets will have consequences.
6.    Students should always go around the net, rather than jumping or straddling over.
7.    Ensure that a proper warm-up is done before each lesson to prevent injury.
8.    Students must never pass through the playing area when a game/drill is in progress.
9.    Always have the class supervised.
10.    Have a secondary area to play if the courts are slippery or wet.
11.    Have a first aid kit available in case of injury.
12.    If a student is hurt make sure that if it is serious they get help, and do not continue playing.
13.    Make sure the students inform you of any previous injuries which may become aggravated

MANAGERIAL ROUTINES:

Class Rules:
-    Get permission to leave classroom (washroom, water)
-    No gym strip results in an assignment (ie. Tennis topic, or teacher evaluation, like time on task sheet)
-    Being late or unexcused absence results in being in charge of set-up and clean up for a week
-    Have students keep equipment still when demonstrations and explanations are taking place
-    Respect classmates, guests, and teacher
Starting and Ending Class:
-    Introduce task, outline the lesson at start
-    Class discussion, comments, concerns, questions at end of lesson
Activities:
-    Rotate partners around
-    Try to split up ADD and ADHD students (have one of each in class)
-    Adjust rules/equipment to include everyone
Teacher Position:
-    Use appropriate angle when demonstrating, so students can see key movements of the skill
-    Have students backs towards any distractions (ie. Sun, other activities)
Equipment:
-    Have balls in hula hoops, so students have to place them in
-    Set-up done by students not in strip or students who missed last class

LESSON PLAN:

Unit: Tennis                                                                                                    Lesson: One
Theme: Movement Patterns                                                                            Grade: Ten
Learning Outcomes: Students will know how and be able to move                   Equipment: 45 tennis balls, 55 cones, 10 volley
effectively and efficiently.                                                                                 balls, 10 rubber balls, 3 hula hoops, 10 birdies
TIME
LESSON CONTENT
TEACHING POINTS AND ORGANIZATION
20 min
Introductory activities:
- Line game
- Keep it up game
- Get students into partners, number 1 and 2, # 1's go get equipment # 2's go find a space.
- Rules: ball must bounce on own side, ball must go through cones, co-operate-compete
- Cues: stay low, anticipate, recover and relocate
- Diagram, see above
- Switch partners around
- Rules: ball/shuttlecock cannot touch ground, object must go above head height, must stay in playing area
- Cues: move to open space, stay low, anticipate
- Diagram, see above
- Pushing off outside foot, staying low, moving to target area.
Tactical Questions: Where do you go after you hit the ball?  How can you fool your partner?
10 min
Skill Development/Concept:
- Demo of forehand grip and ready position
- Shadow drills with partner
- Make sure everyone can see demo.
- Shake hands with the racket, "V" shape ( picture )
- Bend at knees, feet shoulder width apart, racket waist height in front of you
- In partners, #1 leads first and #2 follows, than switch around.
- Partners give feedback to each other on their moving patterns.
25 min
Culminating Activity:
- Rally with Partner
- Use long and narrow court.
- Switch up the partners.
- Who ever loses, starts with an extra point next time.
5 min
Closure:
Get and give feedback about today's lesson
- How can you move more efficiently?
- How can you give yourself more time to prepare for a shot?

Evaluation:
- Where your outcomes met?
- Did the students enjoy themselves?
- How can you improve the lesson?

Unit: Tennis                                                                                                    Lesson: Two
Theme: Forehand                                                                                           Grade: Ten
Learning Outcomes: Students should obtain an understanding of aspects          Equipment: 45 Tennis balls , 64 cones, 8 volley     associated with space, time and consistency of the forehand.                           balls, 8 rubber balls, 3 hula hoops
TIME
LESSON CONTENT
TEACHING POINTS AND ORGANIZATION
10 min
Introductory activities:
- Castle Game
- Get students into partners, number 1 and 2, # 1's go get equipment # 2's go find a space
- Rules: ball must bounce once before you hit it, ball must be hit above head height, and alternate hits with partner
- Cues: bend at knees, stay low move into target area
- Diagram: see above
- Tactical Questions: How can you give your partner more time?
Where do you go after you hit the ball?
- Have various balls and other equipment (rackets, paddles, etc.) to suit all ability levels
25 min
Skill Development/Concept:
- Demo of  forehand
- Over space game
- Wall Drills
- Make sure everyone can see demo
- Switch partners for over space game (#1's stay where you are, #2's go get equipment and find a new #1)
- Show students how to set up court (see above )
- Rules: must hit above head height, keep ball into play, ball must be hit over area
- Cues: recover and relocate, stay low, anticipate
- Everyone finds a space near the wall
- Hit forehands working on consistency, (How many times can you keep it going? )
20 min
Culminating Game:
- Mini-game with partner
- Switch up the partners again
- Play on a long and narrow court
- First to win 3 games, than find new partner
5 min
Closure:
Questions
- How can you keep the rally going?
- How can you give yourself more time to play the ball?
- How can you improve you consistency?

Evaluation:
- Time on task
- Were your outcomes met?
- Did the students achieve the learning outcomes for the lesson?  If not, why?
- How can you improve the lesson?

SAMPLE TASK CARD:

Name:           

Practice these progressions with a partner, and once you feel comfortable with a level, mark it off on the sheet.  This level will later be cross-referenced with my own observations of your play.

Forehand
Backhand
Forehand Volley
Backhand Volley
Down the line with partner tossing the ball. (5 in a row)


Cross Court with partner tossing the ball. (5 in a row)


Rally with partner to deep third of the court continuously for 10 shots.


Rally with partner hitting ball to deep corner’s continuously for 10 shots.


Focus on proper form and technique, as shown in class, when performing these tasks.  Begin in the ready position, prepare early and the follow through. 

USEFUL LINKS:

www.tenniscanada.com

www.tennisbc.org

www.revolutionarytennis.com

www.tennisone.com

REFERENCES:

    Griffin, L. L. Mitchell, S. A., and Oslin, J. L. (1997).  Teaching sport concepts and skills: A tactical games approach. Champaign, Il: Human Kinetics.

    Hopper. (1998).  Teaching games for understanding using progressive principles of play.  CAHPERD, 27(1), 1-5.

    Thorpe, R., and Bunker, D.  (1989).  A changing focus in games teaching.  In L. Almond (Ed.), The place of physical education in schools (42-71).  London: Kogan/Page.