Tasks/activities
Task
Analysis
Ready
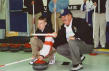
Position: Stance and Body position prior to backswing
The
game of curling involves extreme stability, considering that if there is
any changes in the body position within the stance, backswing, or even
the forward extension (slide), the results of the shot thrown can be devastating.
Therefore, the ready position is essential because it is a precursor to
the following movements. The stance and body position must be consistent
at all times to allow students to understand that from this position, the
power, control and balance needed for the next shot relies heavily within
the ready position.
The ready position can be achieved by:
-
allowing
the non sliding (hack) foot to be placed properly so the toes are pointing
in direction of throw.
-
placing the
ball of the hack foot against the back of the hack for force generation.
-
maintaining
a staggered stance, where the sliding foot's heel is in line with the hack
foot's toes.
This picture illustrates the ready position for both left and right
handed players.

Proper ready position prior to backswing.
-
throwing
arm is extended and broom arm is extended outwards to the side.
-
eyes and
head are forward focusing on the target.
Teaching
Cues:
-
1. Knee of
hack leg must be pointing in direction of throw.
-
2. Stone
is placed on center line, not placed where the target is. All shots must
begin on center line then with when in forward extension, the shot moves
towards target.
-
3. Clean
the bottom of the rock, to remove any hairs and/or debris.
Balanced
Delivery
In
addition to the stance, the body during the delivery must be stable so
the rock can maintain its momentum and shot path. The body position must
be consistent with every shot, so the student can learn from each shot
thrown, whether to adjust weight or to get the body lower.
This can
be achieved by:
-
remembering
that there are 4 contact points to the ice (throwing arm VIA the stone,
broom arm, slide foot, and hack toes).
-
throwing
arm remains extended from stance through to follow-through.
-
broom is
placed upside down on the ice and moves correspondingly with the slide
foot and rock during backswing and forward extension.
-
slide foot
in forward extension is placed behind the rock along the shot path to bear
the majority of the weight.

Slide foot behind rock for a consistent balanced delivery.

As slide foot moves behind the rock, the thigh moves under the shoulder
and torso to bear the majority of the weight during a balanced delivery.
-
in forward
extension, the hack leg extends due to force generation and thus the toes
follow through, points towards the hack, and therefore provides another
essential contact point in the balanced delivery.
Teaching
Cues:
-
1. The broom
must move, if remained constant, the body will be altered and thrown off
target. When the broom is moved, it should never move behind the slide
foot.
-
2. In the
forward extension, the rock is placed in the most extended, comfortable
reaching point. This allows the body to stay low.
-
3. The throwing
arm, stone, slide foot, and hack leg should follow shot path. Should be
able to draw a straight line from the hack toes to the index finger of
throwing arm.
Grip
Another
essential component in curling is the grip. It is important to not handle
the rock as a baseball bat. In curling, a loose grip is preferable.
This can
be achieved by:
-
placing the
rock within the base of the index and middle fingers.
-
placing the
thumb on top of the handle to form a "V" shape with the fingers.
-
placing the
knuckles so that they rest under the handle and on the rock.
Note the index and middle fingers and the "V" formation with the thumb
Teaching
Cues:
-
1. Rest hand
on rock, when motion begins, the index and middle fingers will act as the
guides due to force.
-
2. Use a
light grip, do not tighten or clasp the hand.
Turn
The
turn or rotation of the rock is what makes the shot curl. It is important
to know the differences between the two turns (in-turn and out-turn) to
show consistency in accuracy and placement.
This can
be achieved by:
-
in-turn
(clockwise), have the handle pointing at the "10 o'clock" position while
in the backswing through to approximately three feet before release.
-
within the
three feet of release, use the index and middle fingers to guide the rotation
and release at the "12 o'clock" position.
-
out-turn
(counter-clockwise), similar application, but the handle begins in the
"2 o'clock" position.
Teaching
Cues:
-
1. Once the
call has been made about type of shot and turn, have the turn already in
place when in stance, backswing and forward extension.
-
2. Only the
index and middle fingers guide the rotation.
-
3. Important
to note when in forward extension, while sliding down shot path, the middle
of the rock should be in line with shot path, not the handle.
Releasing
the Rock
The
release of the rock should be done so within the last three feet of the
slide. When throwing and you have decided when you want to release, then
begin by applying the turn and finish in the "12 o'clock" position. The
release of the rock has to do more with the beginning of the follow-through
phase, meaning that the hand or grip should not continue to turn after
the release.
This can
be achieved by:
-
forming a
"handshake" position upon release.
-
because the
turn ends at "12 o'clock" the hand should already be in a straight line
with target, therefore allowing the handshake formation.
Teaching
Cues:
-
1. The turn
leading to the release is a gradual movement, rather than deliberate. With
the momentum produced by the push off, the fingers guide the turn into
the release which allows a fluid handshake formation.
Judging
Stone Weight
If
the stance, delivery, grip, turn and release is practiced and maintained
consistency throughout each shot, then the stone weight should come with
ease. This is not the case. Judging stone weight is easily the most difficult
aspect of the game, because it cannot be easily taught with instruction,
it must be practiced.
This can
be achieved by:
-
develop a
feel for how much push off was used for each throw, how high the hips elevated,
and how far the slide foot moved backwards.
-
within the
backswing, the backward movement of the stone forces the hips to elevate,
so arm extension can be maintained, which acts as a guide for how much
force was applied to the rock.
-
getting the
feel for how far your slide foot moves behind the hack during the backswing
allows for some understanding of how much force was applied to each shot.
Teaching
Cues:
-
1. Develop
a feel for how much force was applied to the ball of the hack foot and
the speed of the body over the ice during the forward extension.
Shot Types
There
is numerous types of shots within curling. Each one has a purpose and therefore
it is important to have learned all of them so you can have these options
when the situation arises. The different shot types are as follows: takeout
(heavy, control, board, backline, and hack), draw, raise, peel, and guard.
Draw:
Draw
weight is the most difficult weight to produce, because it must end up
within the house. With other weights, the result usually involves hitting
another rock, therefore if a draw has enough weight and the throw is accurate
the task is completed. The following diagram illustrates the shot path
of a draw and the result of it:
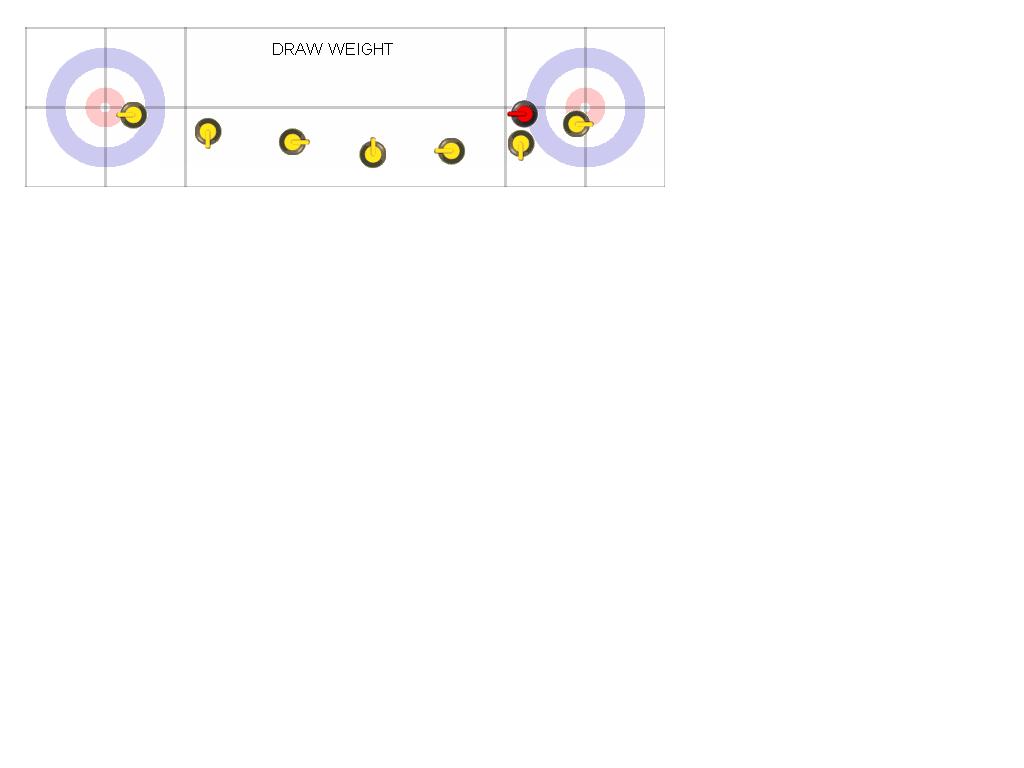
Teaching
Cues:
-
1. Extension
of body throughout forward slide and release.
-
2. Focus
on "T line" for weight judgment. T line is the area intersecting the button.
Take-Out:
There are several types of take-outs, each having its own purpose based
on weight and speed of impact. There is heavy take-out weight which is
used mainly when the skip wants a double or triple take-out (when two or
three opponent rocks leave the house). When one rock impacts another, that
rock absorbs much of the force, therefore when two rocks have to be taken
out, more weight has to be applied to create more force. A heavy take-out
looks like the following:

Other
take-out weights are as follows: board and control (behind hack), hack,
and back line (behind house). Board and control take-out weights usually
involve knocking out an opponent's rock, but the skip would like control.
Hack and back line weights are used mainly for taps, whereby tapping a
rock to the back of the house would provide "backing" for subsequent rocks.
Teaching
Cues:
-
1. Focus
on ball of hack foot when producing maximum force.
-
2. Do not
focus too much on force, because body might be thrown off shot path.
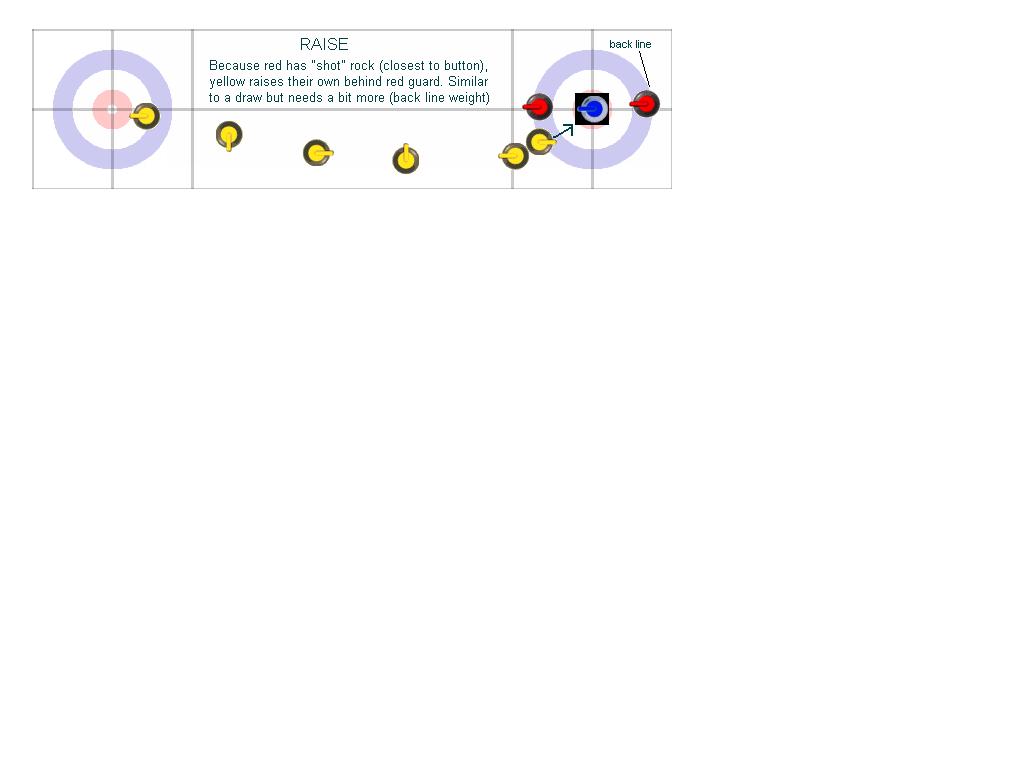
Raise:
Raising
a rock is simply raising a rock onto another. This tactic is usually performed
when there is limited room to draw into the house and/or to strategically
bump your own rock so it is covered by that raised rock or other guards.
It is easily one of the most difficult shots because of weight. If there
is a guard fairly close to the house and you wanted to raise it so it went
into the four foot, then you could not just throw normal draw weight, because
of the force absorption that occurs when two rocks impact. Therefore, you
would need to throw back line weight or back eight weight and so on. Confused
yet? Hopefully this diagram below will help:
Peel:
A
peel is a shot that requires the thrower to throw heavy weight (similar
to heavy take-out weight) and "wick" the guard, so both rocks spill out
of play. A wick is when a rock skims off of a small portion of the targeted
rock. This tactic is used to clear the front of the house (to remove guards)
and it usually occurs within the last couple of ends during a game. Skips
often use this tactic near the end of the game, because if the score is
close, then many guards will be placed up. Mainly the team that is down
a point, will put up guards so they have a chance to draw around or raise
to tie or win the game. The team that is up will try to peel off guards,
as well as their own to prevent this from occurring.
Sweeping
Sweeping
is one of the two main concepts in curling, the other being delivery. Sweeping
concepts are communication, weight transfer, force production, angle of
broom and arm, and inside foot. Recently, sweepers can sweep opposite of
each other, this introduces a new concept, spatial awareness. While sweeping,
a sweeper must be aware of the sweeping path that he/she is taking and
also be aware of his/her partner's sweeping path, so banging of the brooms
does not occur. Another new concept is rhythm development. To help learn
the sweeping motion, students can develop their own rhythm to help maintain
consistency throughout. Sweepers shall choose rhythm, such as "sweep" and
"ing" or "1" and "2".
Teaching
Cues:
-
1. Lateral
movements with feet facing opposite sweeper.
-
2. Weight
on inside foot, then transferred to outside foot as adjustments are made
while in lateral motion, then back to inside foot to produce force.
Activities:
1.
Aiming Along Shot Path
Drill Explanation:
-
In groups of 2
-
Each group gets 3 cones, 1 piece
of string, and 1 piece of tape
-
Set Up: 'Hack' is marked by piece
of tape. The string is attached at the hack. Three cones are place
at different distances from the hack.
-
One person is the thrower, the
other person decides the direction of the throw by pulling the string to
either cone one, two, or three.
-
The thrower then attempts to deliver
the scooter board directly to the cone.
-
The partners then change positions.
-
The objective of the game is to
hit all three of cones by following the shot path
Concept Development:
-
To consistently
aim for target along the shot path
Extension:
-
cones further apart and at at
longer distance from the hack
Teaching Cues:
-
Throwing arm, scooter board, and
body in line with shot path or imaginary line
-
square to target
-
eyes and head focused on target
2.
Curling Dog (Modified British Bulldog)

Game Explanation:
-
full basketball court, 10 pylons
to mark end safety zones
-
two students start in the center
of the court, 28 other students start in safety zone
-
students in the center yell "Curl",
the others must then run across the gym without getting tagged
-
if they're tagged they become
part of the center team
-
in order not to get tagged when
out of safe zones students may duck into the
-
curling delivery stance
-
the game is over when all but
five students are in the middle
Concept Development:
-
To review the 'curling delivery
stance' while playing a fun and active game.
Extension:
-
a progression of lateral movements
may be added in half way through the warm-up
Teaching Cues:
-
run to open space
-
when going into safety position
bend knee and take weight onto front left foot (right handed thrower)
-
be careful running into safety
zones, watch out for others
3.
Curl Ship
Game Explanation:
-
8 pylons, 4 safety zone signs
(thrower, sweeper one, sweeper two, skip)
-
two students start in the middle
(rocks), the rest of students start in throwers safety zone
-
half way through teacher calls
out a safety zone and students must run to that area without being tagged
-
if tagged, the student becomes
part of the rock team
-
in order to avoid being tagged,
a student may crouch into a curl delivery position
Concept Development:
-
To review the 'curling delivery
stance' while playing a fun and active game.
Extension:
-
progress to lateral movements
and sweeping movements
Teaching Cues:
-
run to open space
-
when going into safety position
bend knee and take weight onto front left foot (right handed thrower)
-
be careful running into safety
zones, watch out for others
4.
Aiming for Points
Drill Explanation:
-
in groups of 10 (students stay
in order throughout whole game)
-
3 stations with tape on the wall
(the tape runs vertical)
-
each piece of tape represents
a different point (ie center tape is 5 points, tape on either side of center
is 3 points, tape on the far right side and left side is 2 points.)
-
try to hit the tape with a bean
bag
-
a marker is laid out to represent
the hack (students must throw from there)
-
whoever gets up to fifteen points,
gets to move to the fourth station
-
the fourth station has markings
on the floor
-
these markings also have points
associated with them (these line go across the throwing surface)
Concept Development:
-
to understand the skills for aiming
and force control
Extension:
-
use different throwing objects
such as tennis balls or scooter boards
Teaching Cues:
-
throwing arm rock, and body in
line with shot path or imaginary line (square to body)
-
take note of the feel of how much
push off was used for each throw, how high the hips were elevated and how
far the slide foot moved backwards
5.
Scooterrrriiiiifiiiiic
Game
Explanation:
-
there will
be two teams of four playing against each other
-
students
are divided into leads, seconds, thirds, and skips
-
leads will
begin by throwing a scooter board along the gym floor towards a target
(pylon, cone or archery target)
-
to simulate
sweeping, place blind folds or pinnies along shot path, so sweeper are
forced to sweep them away so the scooter board can maintain its momentum
-
the skip
will call the shot and watch for safety concerns (i.e. if the scooter board
veers off path and into another game)
-
each team
will alternate throws (alike a real curling game) and will follow the order
of play (leads throw first, then seconds, and so on)
-
team closest
to target or button within two throws receives a point
Concept
Development:
-
to begin
to understand the tactics involved in a real curling game (order of play,
efficient sweeping, applying stance, backswing and forward extension components,
communication)
Extension:
-
provide
opportunity for students to answer questions (Guided Discovery) and to
demonstrate these answers to peers and teacher.
Teaching
Cues:
-
same principles
applied to stance, backswing, and forward extension (weight transfer, force
generation, corresponding movement, arm extension, etc.).
-
effective
movements for sweeping (low, balanced, weight on inside foot, rhythm, communication).
6.
Horse

Game Explanation:
-
two players play against each
other
-
Four Zones: #1= front half of
the free guard zone, #2 = back half of the free guard zone, #3 = front
half of the rings, #4 = back half of the rings
-
the players decide where to start
from
-
the player playing first declares
the zone that s/he thinks the rock will go to
-
if successful, the opponent has
to match it
-
if unsuccessful, the second can
hang a letter on the first by either successfully drawing the declared
zone or s/he can choose to establish a new zone
-
success in drawing the zone declared
by the player who declared it, results in retention of the right to declare
the next zone
Concept Development:
-
to develop aiming accuracy and
good judgment
Teaching Cues:
-
begin with simple tactics, then
progress to more complex tactics which will involve some critical thinking.
7.
Curling Basics: Curling Simulator
Game Explanation:
-
part of one class will include
going to the computer lab
-
Curling Basics: www.curlingbasics.com
will be used to demonstrate basic curling situations by way of animated
practical examples
-
students will use this program
to 'get a feel' for curling
-
they will start to learn terms
by watching examples of different plays
-
some examples are: Takeout, Free
Guard Zone Rule, Guard, Rink, Double-Takeout
Concept Development:
-
To learn different curling plays
before getting onto the ice
Extension:
-
to fill out a curling worksheet
as they go through the different animations
Teaching Cues:
-
circulate the computer lab asking
questions about certain plays
8.
Curling Delivery
Drill Explanation:
-
using the self check criteria
sheet
-
demonstrate first and then ask
students to go through criteria for stance, backswing, and forward extension
Concept Development:
-
To learn stance, backswing, and
forward extension through reading cues
Teaching Cues:
(criteria sheet)
9.
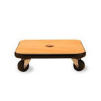
Line Dancing (on ice or in gym)
Drill explanation:
-
Using four to eight players per
sheet, the goal is to have all eight stones come to rest on the center
line as close to the house as possible. A point is rewarded for each rock
remaining on the center line after all eight stones have been thrown.

Concept development:
-
learn the concepts behind a shot
path, and the use of shot line
-
learn to control weight transfer
coming out of the hack (push with hack leg not arm)
-
shot control and accuracy
Teaching cues:
-
control the distance a shot
travels by using a strong or light push with hack leg
-
body shot line (arm, body, knee,
leg, foot) in line with target
the center line is not your
shot line, the shot line will be slightly off center, the rock will curl
into the center.
10.
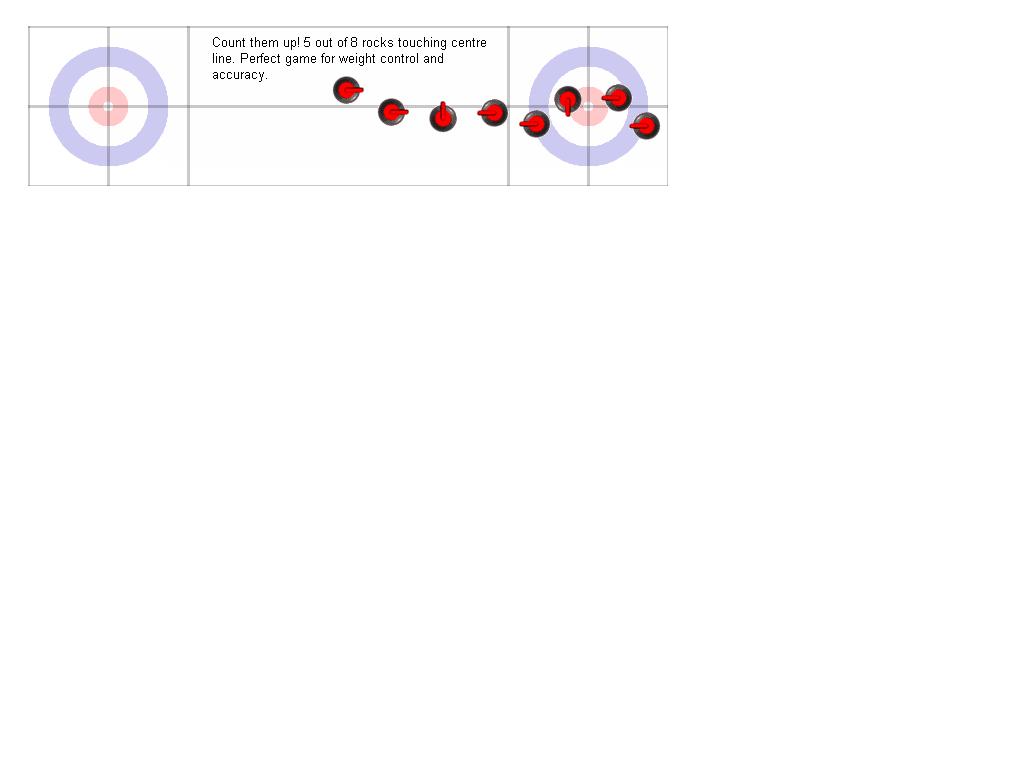
Circle Drill (on ice or in gym)
Drill explanation:
-
Stones begin at opposite ends
of two adjacent sheets of ice. We will have eight players filling each
of the four positions on each sheet.
-
The delivery will take place on
each sheet at the same time.
-
When each shot comes to a complete
stop players will rotate positions (shooter to brusher one, brusher one
to brusher two, brusher two to skip and the skip crosses over to the adjacent
sheet to become the shooter on that sheet).
-
The drill continues until all
stones (scooter boards) have been delivered. This would conclude round
one of as many rotations as you feel necessary.
Concept development:
-
helps students to get a feel for
a game like situation
-
they learn positioning and roles
without having to wait around
-
this drill provides students with
feedback that can be put into practice immediately
-
conceptual focus can change depending
on what the teacher feels the students are developmentally ready for.
Teaching Cues:
-
can focus on aspects of the delivery,
sweeping, skipping, game play. etc..
-
cues change depending when and
why this drill is used
11.
Hide and Seek

Game Explanation:
-
teams of two
-
the object of this drill is to
draw behind guards in an effort to prevent, or at least make it as difficult
as possible for your opponents to remove your rock from play
-
one team manually places a guard
rock (that team wants to hide behind it)
-
the opposing team's task is to
remove that stone from play
-
if the drawing team fails to draw
behind the guard, it's a simple matter of an open hit
Concept Development:
-
to learn tactics, accuracy, and
aiming
Teaching Cues:
-
apply principles of play and delivery
(stance, backswing, forward extension)
12.
Raising the House
Game Explanation:
-
two teams play against each other
on the same sheet
-
each team puts four of its rocks
in a line in front of the house
-
these stones are placed alternately
by colour with about a stone's width between each
-
each player then delivers one
stone alternating with the other team
-
the object is to score points
by "raising" stones into the rings (house)
-
values of rings: 12 ft=2 points,
8ft=3points, 4ft=4points, button=5 points
 Concept Development:
-
to discover, learn and develop
shot tactics
Teaching Cues:
-
force generation from hack
aim and throw on correct shot
path
13.
Keep Away
Game Explanation:
-
players play as individuals
-
alternating, the players shoot
all the rocks of one color
-
a point is up for grabs on every
shot
-
if the shooter gets the rock to
the house, s/he wins the point
-
if, on the other hand, by brushing,
the brusher keeps the stone out of the house, the brusher wins the point.
-
8 points per game
-
if the score is tied at 8, the
players flip with the winner choosing to be the shooter or brusher for
the decisive 9th point
Concept Development:
-
to learn efficient sweeping
-
to practice aiming and accuracy
-
to develop muscular endurance
-
to learn brushing technique
Teaching Cues:
-
control the distance a shot
travels by using a strong or light push with hack leg
-
body shot line (arm, body, knee,
leg, foot) in line with target
-
for sweeping, weight is on inside
foot (foot closest to rock)
Home