ProTools
audio editor short user guide
Version 6
This note explains in brief how to perform two common editing tasks to be done after recording (“tracking”) is completed:
- eliminating blank spaces between movements or pieces
- fixing errors or other problems when two or more “takes” of the same piece are available. .
Editing is a musical process, accomplished by careful listening at all times. Do not edit by sight alone.
Getting started
- Launch ProTools by double-clicking the icon.
- File: New session
- Create blank session
- Select parameters
- Audio file type: wav
- Sample rate: 44.1 KHz for CDs
- I/O settings: last used
- Bit depth: 24 bit
- Save as: choose as descriptive name
- Where: Project Space
- click “save”
- You will see:
- edit window
- ⌘ = (apple command key, plus = key at same time) opens mix window
- ⌘ k1 (⌘ plus keypad1, not 1 on top left) opens transport window
- session setup window ⌘ k2
- Menu bar on top: Setup:
- hardware setup: Digidesign MBox 2
- clock source: internal
- click ``ok``
- in Edit window
- click arrow in bottom right corner to open audio library (column on right) heading is `regions`` click again to hide it
- click arrow in bottom left to open track library, groups (column on left), click again to hide it
Importing audio
- Shift ⌘ i to import audio and bring into into library
- (or click on the “audio” on the top of the audio library column and select “import audio”). Do not use File: import audio to track)
- Opens a menu, choose source directory
- always use audio files from another disk or server such as Fine Arts server
- click on add or convert (only one will be highlighted)
- click on done
- audio import options choose new track location session start
- choose destination folder
- always choose “Audio Files” in same directory as PT session file
- now will process audio and you will see the file in the audio library
- repeat until you have all required audio files
- open new track Shift ⌘ N
- choose mono or stereo as required
- to merge 2 mono files into stereo
- create a new stereo track
- drag 2 regions into it
- to split stereo tracks into 2 mono tracks
- file: split selected tracks into mono
- new blank track is created, called Audio 1
- new tracks when created also appear in the track (left) window
- (usually don’t need track window)
- double click track name to give it a more useful name
- drag segments from audio library (audio window on right) into track
Navigation
- Track may be divided into regions with boundaries (region boundaries are created when record is stopped and restarted, to create regions during editing, see next section)
- set into “multitool” mode (3 linked boxes top mid left)
- Multitool (note different symbols as cursor is moved)
- top half of track see the “I bar”, sets playhead
- bottom half see the “grabber (hand) tool” to move regions around
- move cursor into top half of track, see I bar, click to set the position of the playhead
- ⌘ [ zoom out (apple open-square-bracket)
- ⌘] zoom in
- Zooming is always centred around cursor
- Space bar to start playing, space bar again to stop
- at region boundaries
- top half FADEIN or FADEOUT
- middle TRIM
- bottom CROSSFADE except at absolute region boundary (end of file) where CROSSFADE does not exist
- TRIM does not mean only make smaller, it can also make longer using material “underneath”
- if want to see I bar and set position of playhead close to region boundary in multitool where I bar is not seen
- go into timeline (above the track) to see I bar
- ⌘ Z undo any operation
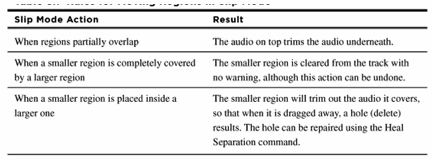
- When moving regions in slip mode:
Some commands
- create marker at playhead using “enter” (on keypad) (not “return” on main keyboard), name the marker
- to show table of markers , go to “windows” show memory locations
- delete
marker by highlighting in marker track and type “delete”
- modes (top left)
- slip mode regions free to move (normally use this)
- shuffle mode eliminates space in time
- grid mode – snap to grid (grid intervals default to 1 sec)
- spot mode reset regions to original time stamp (not generally needed)
- to split into regions, place cursor to desired boundary, right click on cursor (or hold control key and click at same time) , then choose `separate`` from dropdown menu
- to make crossfade: move cursor close to boundary in bottom of track, see crossfade symbol, drag to left or right, observe length of crossfade in window above, normally use 20 msec, may be longer for special reasons, this creates a crosssfade region
- crossfade editor ⌘ F to change shape of the curves of the selected crossfade region
- to select a segment while playing (which can be made into a region if desired
- down arrow marks beginning of segment
- up arrow marks end of segment
- repeat up arrow while playing to update
- to select a segment by sight: drag I bar from start to end of desired segment
- in shuffle mode use “delete” to take out excess length (unwanted selected segment)
- shift click to remove part of selected segment without losing segment
- separation ⌘ E at point or at boundaries of selected segment to create a region
- tab to next region
- option tab previous region
- select region by putting cursor in lower part of track (hand tool) and clicking on it
- select more than one region with shift click
- bulk fade choose multiple regions ⌘ F pick length, type
- edit delete bulk fades
- heal separation ⌘ H: to eliminate separation (boundary) between regions to make one larger region, select two adjacent regions, type ⌘ H, useful to make tracks for CD
- when copy segment, it references the entire sound file, and other parts of are still there “underneath”
- crossfade takes parts from the overlapping versions
- cursor acts on track it is in
- highlight track name means to select it
- transport window preroll/postroll set to 2 sec or so (enter 2 sec or whatever time, then press “enter” or “return”) ⌘ K toggles on/off
Editing strategy
- Always do source/destination editing
- destination at top
- source at bottom
- turn pre-roll and post-roll on ( set to 2 seconds)
Never pick regions by sight, do it by listening. Editing is a musical process!
To define a region: put cursor at approximate start of region, hit <space> to play, and then type down-arrow repeatedly until desired region starts, then up arrow to end the desired region. Tap the up and down keys along with the music, as if playing an instrument.
It is not essential to get a desired region exactly correct, the TRIM tool can be used to get it exactly.
Always edit from beginning in linear fashion, (need everything after edit point to be one segment) otherwise nudge will cause the next segment to overlap following segments
If you mess up or otherwise get in trouble, use ⌘ Z to undo, repeat until back at a useful point.
Removing blank spaces between
movements/pieces
- assume you have only one long recorded track
- create region of blank space to be removed using down and up arrows
- set to shuffle mode
- ⌘ E to select region
- ⌘ x to delete it (adjacent regions will shuffle to eliminate the blank space)
- add crossfade
- set back to slip mode
- file: save session as “name-number”
Fixing mistakes
- make track 1 the destination track at top (best take), make track 2, 3, etc, the source tracks (other takes)
- if all tracks are in one long file, then segment the file into separate regions with ⌘ E, one for each take, and drag these segments into separate “source” tracks.
- set preroll/postroll to about 2 sec
- create markers at location of mistake (in destination) and corresponding fix (in source). name them mis1, fix1, etc.
- start with first mistake, define mistake and fix regions using down/up arrows by listening then segment it using ⌘ E. Typical region boundaries are end of decay, beginning of next attack
- set shuffle mode, copy fix region ⌘ C, then select mistake region, then paste ⌘ V on top of mistake region, return to slip mode immediately
may have gap at end if fix was shorter than mistake, that may be ok musically, or may be not ok. If not ok, then need to nudge
nudge using keypad +- (or function keypad +-)
- trim first part (decay) close to attack in next region
- add crossfade +- 20 msec
- file: save session as “name-sequencenumber”
- repeat steps 4-8 for next mistake/fix
Making CD
- merge mono files into stereo
- create a new stereo track
- drag 2 regions into it
- heal all separations within a CD track
- shift ⌘ K export selected as files (should be stereo files, one for each CD track)
- select file type, bits 16, format stereo
- make new folder for exported files
- drag files into toast to make CD
for making DVDs, may need to split stereo tracks into mono
file split selected tracks into mono
Troubleshooting
- Heal separation ⌘ H does not work
- Zoom in, you will probably find
- Crossfade, or small gap
- Eliminate these, then ⌘ H will work
- If in trouble, then ⌘ Z to undo one step, ⌘ Z again to undo multiple steps until back at a reasonable point