Geniuses Responsible for this page:
Larry Chernoff
Kirsten Odegaard
The Major Themes of Orienteering 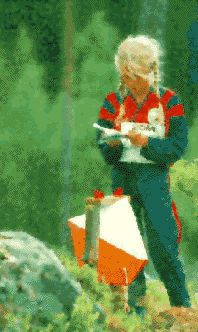 |
Where am I?  |
Where do I want to
be? 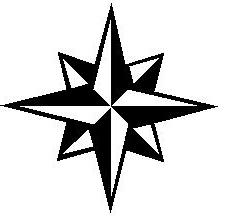 |
How am I going to get
there? 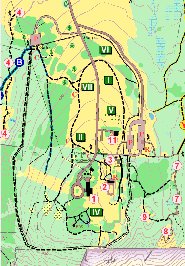 |
| Philosophical Statement link |
| Entry Level and Exit Outcomes link |
| Unit Learning Objectives link |
| Sequence of MAJOR Events link |
| Warm-Up Activities link |
| Managerial Routines link |
| Block Plan link |
| Psychomotor and Cognitive Subject Matter link |
| Assessment Procedure link |
| SAFETY CONSIDERATIONS link |
| Teaching Style Description link |
| References link |
Philosophical
Statement
We believe that Physical Education should promote active health for
every individual through a wide range of exciting and informative activities.
This orienteering unit will do this by introducing students to a fun and
challenging sport through a variety of actives and teaching styles.
Orienteering is an ideal sport for the promotion of active health.
People can participate in it individually or with others, people can choose
what level to participate at, and it is a life long sport.
Table
of Contents:
Entry
Level and Exit Outcomes
Going into this unit, we expect the students
to have almost no knowledge or experience in orienteering. However,
this being a grade 10 class, we know they understand the concept of a treasure
hunt, which is what orienteering basically is. We also expect there
to be a broad range of fitness levels in the class.
What we hope to do is build on the idea of a treasure
hunt, gradually introducing the rules and tactics of orienteering.
By the end of the unit, we would like the students to have a general understanding
of the rules, how to orient themselves and the map, and the tactics of
route planning when orienteering. We would also like them to develop
appreciation and enjoyment for the sport.
Table
of Contents:
Cognitive Domain:
Psychomotor Domain:
Affective/Social Domain:
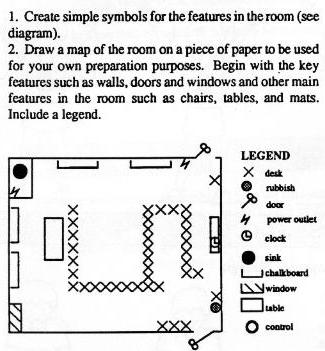
| Lesson
1: Take home assignment. Draw a map of your bedroom using
the symbols designated on the handout. Concepts to consider:
scale.
Lesson 3: Take home exam on rules of orienteering. Consult handout to answer questions. Lesson 4: Medium sized course timed run. Lesson 5: Take home exam on map reading symbols. Consult handout to answer questions. Lesson 6: Bring A Whistle. A professional from a local orienteering group will set a course and talk about CAR. Lesson 7: Same course timed run, second trial. Lesson 8: Field trip to less known environment. Lesson
10: BIG EVENT. Field trip to an Orienteering event.
|
| Capture
The Flag:
Appropriate for introducing concept of running to a fixed position (the flag) and returning with a symbol (the flag) to the starting area (team home base). Divide the class into two groups. The goal of the game is to hide your flag from the other team and prevent them from getting it to their home base. Home base can be a hoolahoop hoop or any designated area. To keep the other team from capturing your flag you may tag them when they have the flag, if tagged the person must go into your jail. The captured person may only be freed if one of their teammates tags them in the jail. Progressions: Walking on a small course, Jogging on a larger course, Running on a big course. EXTENSION: How can the flag be harder to get to? Place the flag this time in a difficult to approach place. how can the flag be found quickest? Work as a team, communicate. Brain Teasers: With map of gym partners must reach areas (controls) designated by the teacher. (points on the wall, on the floor, controls placed in different areas). Hide brain teasers at specific spots and mark the spots. Tape them in place and have students run around and see how many they can find, they get a pencil and paper. The top mark goes to the team with the most correct answers. Command - explain if there are obstacles or constraints, e.g. can only walk on lines, lines of certain colours, mats, benches, etc. these act as a certain type of impassible barrier. EXTENSION: have the partners work as a three legged team. -what methods were most effective? - how did you read the map? - what made the map easy to read? - scale - how did you accommodate movement with the handicap? This represents the varied terrain one might find on the orienteering course. Guided Discovery So You're A Sailor? Class walks, then jogs, and finally runs to designated sides of the gym upon the teachers command. - Students must touch that wall and return to the centre of the gymnasium. The teacher assign nautical ship terms for each wall. (starboard, bow, stern, port sides of gym). - Have them turn around three times and then call out a direction. - Combinations: Face starboard, take three steps toward the stern, etc. The Cardinal Directions: CD Game: Groups of 5 (easy) groups of nine (more advanced). Teacher establishes the Geographical directions of the Gymnasium. Group of 5: One person in centre with a ball, other four students line up with N,S,E,W. A person shouts their direction and the centre person throws them the ball, the ball is returned. After 3-4 throws have the centre person switch, each student gets a chance in the middle. Group of 9: Same as above but with NE, NW, SE, SW as well. The centre person only gets 2-3 tosses to save time. Practice Extension: Teacher shouts out direction and student tries to throw it to the right person. Command and Practice If it's nice have the class try it outside and see if the can orient themselves in a new environment. Self Check Partner tag: - Ask the class to break into partners and select a number (one or two). - ones are "it" - if a partner is tagged they become "it", the chase ensues again. - Use a confined space. - A speed increases the space should increase, if the game is not going well decrease the area. - Have a penalty for bumping into other people (five: jumping jacks, burpees, push ups, etc.). - Progress from walking, to walking on lines, to running (adjust the size of the playing area to best fit a safe environment). Practice Master Map Game: - Initially indoor version, then progress to an outdoor version. - Groups of four (or more depending on class size). - You can make one or more maps, this requires placing many controls. - Each team has a blank map. - Each individual has a control sheet. - Teammates run across the gym and memorize a control location, run back and draw the control location on the team blank map. - Teammates alternate runs until all controls are recorded. - The course is then run by the entire team who fills in an individual control card. Practice - A master map with all controls will allow students to check the drawing of controls during the game. Self Check Orbiter: (an adaptation of musical chairs) - There is one fewer chair than student. - The extra student is the caller. - Caller: says a students name, that student must state one of the rules of orienteering (the teacher may need to prompt some of this) - keep a set of rules on hand. - All non seated students have to: walk, skip, hop, jog, leap, etc. - teachers choice. -When the last student has left the chairs the teacher yells "Orienteering" and the students scramble to get a seat. -The standing student without a chair has become the caller. Reciprocal, Command, Practice Card Relay: - students get in groups of four and number themselves one to four. - using a deck of cards each student is assigned a suite based on their number. - Stations are set up around the gym with versions of the same task at each station, students select the task they think they can complete and do this task the number of times the card they choose dictates. - Cards are laid out in the centre of the gym face down, with stations at the far corners of the gym. Inclusion Spelling Bee: - Students will run a timed course on the soccer field. Controls will be mapped and a map will be distributed to each student. Each student will be assigned a word or series of word to spell. Each control contains a number of pieces of paper with a letter on it. Can also use stamps for the control card. - may use a number of start points each with a different word. If students finish early go to the next start site and get a new word. Extension: Set invisible barriers (fun: tigers, lava pit, dragons, President Bush with a Gun). Practice, Self Check Traffic Light: - Play a game of Simon says. - Teacher says a colour and students move at that rate until the teacher says the next colour. -Students will move with a specific movement pattern (animal walk, skipping, leaping, hopping, side stepping, backwards, etc.) and at a specific pace. Command Balls, Balls Everywhere! - To be done in the gymnasium. - Students will each grab a soccer ball. -A series of obstacles will be placed on the gym floor. - Students will be divided into four groups. Each group will walk then jog then run a simple orienteering course while at the same time dribbling a soccer ball. -Each control will have a various word. The group will come together and try to make a sentence using as many words as possible. Self Check |
Required Equipment: 20 controls, borrow or buy several types of home-made or commercially available control markers and compasses for at least half the class.
| Review skills and concepts (R) - Lesson One | New skills and concepts (NSC) | Major teaching points (MTP) | Organizational teaching strategies or styles (OTSS) |
| 1. Route Planning
- When orienteering your goal is to reach all controls in the least amount of time. - A straight line may not be the fastest way to travel between two points. - The route is planned around your own strengths and weaknesses. - A strong runner may choose a longer but smoother route, while a sure footed person may choose a shorter but rougher path. 2. Orienting Using a Map (the concept of a map): - The map is a birds eye view and miniature depiction of the room, playground etc. - Photocopies of gym map with all items of equipment marked on, one for each student. - Find a bearing. - Line up the visible bearing with the map bearing. - Turn your body to face the direction you want to travel (don't turn the map). 3. Defining Control - A stamp that located at a designated point on the map. - Must be collected in order (i.e.: 1,2,3, etc.) - In competitions is hanging from a red and white flag. |
1. Route Planning:
Using different strategies to capture the flag. (Guided discovery) - Is it best to run straight at the flag? - What is the quickest way of finding the flag? - teamwork or individually - How do you avoid being put in jail? - What method best keeps the flag safe? 2. Route Planning: Experimenting with methods of moving to various points in the gymnasium with varied obstacles. (Guided discovery) 3. Team Work: Thinking on the RUN.
4. Orienting Using a Map (the concept of a map):
Keep it to SCALE: Handout of Room
Map Template and Key of Symbols.
|
Entry Level:
Understanding of the concept of capture the flag. Exit Outcomes: Can use familiar land marks to orient a map and find hidden treasures. Will comprehend that it is not speed or accuracy but both that makes a good orienteer. Warm-Up: Capture The Flag Inclusion EXTENSION: - be sure to ask what methods were most effective (see Lesson One 1.MTP) (20 minutes maximum) Guided Discovery Lead-In: - Capture the flag gets students accustomed to the basic pattern of orienteering, which is: find the control, plan your route to the control, run to it, and collect the marker at the control site. 1. Brain Teasers: - This introductory activity stresses not only that orienteering requires a person to be fleet of foot but also that they must be accurate in what they record from the control site. - Riddles - Use an extension only if the class is at a competent level. - Encourage students to not yell out the answers as they will be disqualified from winning if they do so. - Have an answer session at the end of the class if time allows. Encourage students to help answer before you do. Keep a set of answers on hand to save face. 2. Orienting Using a Map (the concept of a map):
|
| 1. What has feet but
can't walk?
2.What has eyes but can't see? 3.What has hands but can't feel? 4.What has ears but can't hear? 5.What has teeth but can't chew? 6.Spell mousetrap in three letters. 7.Spell pickle backwards 8.There are ten copycats in one car, if one gets out how many are left? 9.What is easy to get into but hard to get out of? 10.How much dirt is there in a hole 1 foot wide and 1 foot deep? 11.How far can you go into the woods? 12.What had 4 eyes and runs more than 2,000 miles? |
| Review skills and concepts (R) - Lesson Two | New skills and concepts (NSC) | Major teaching points (MTP) | Organizational teaching strategies or styles (OTSS) |
| 1. Route Planning
2. Orienting a Map
3. Creating a Map.
|
1. Pacing:
2. The Cardinal Directions:
3. Compass Orienting:
|
1. Pacing:
- Rate at which you can cover ground at a give pace. - Strides it takes for you to cover a given distance. - Importance for using map scale and measuring distance covered in any one direction. 2. The Cardinal Directions:
3. Compass Orienting:
|
Entry: Can use familiar land marks to orient
a map and find hidden treasures. Will comprehend that it is not speed
or accuracy but both that makes a good orienteer.
Exit: Can orient using a compass. Can use the compass to orient and move in a specific direction. Understand that geographical directions are fixed and can be used to orient oneself on a map. Warm-Up: Class does series of tasks on teacher command: One push up. Touch your toes. Five Jumping Jacks, etc. So You're
A Sailor?
3. Compass Orienting: Class is paired with one compass per group. Orient to north, south, east, and west via direct instruction. Command. 4. Pairs: run a small indoor
course based on the learned concepts. Use benches, mats, chairs,
doors, etc. Lable controls: with a direction, number, and location.
e.g.: east 10 door. Each student is given a compass and control
card.
|
| Name: _________________________________ | Distance: ___________________________________ |
| Pace: | Walking | Jogging | Sprinting |
| Time: | W: | J: | S: |
| Strides: | W; | J: | S: |
|
Finish Time: ______________ Course: ______________________ Time Taken: ____________________ |
| 1 | 2 | 3 | 4 | 5 |
| 6 | 7 | 8 | 9 | 10 |
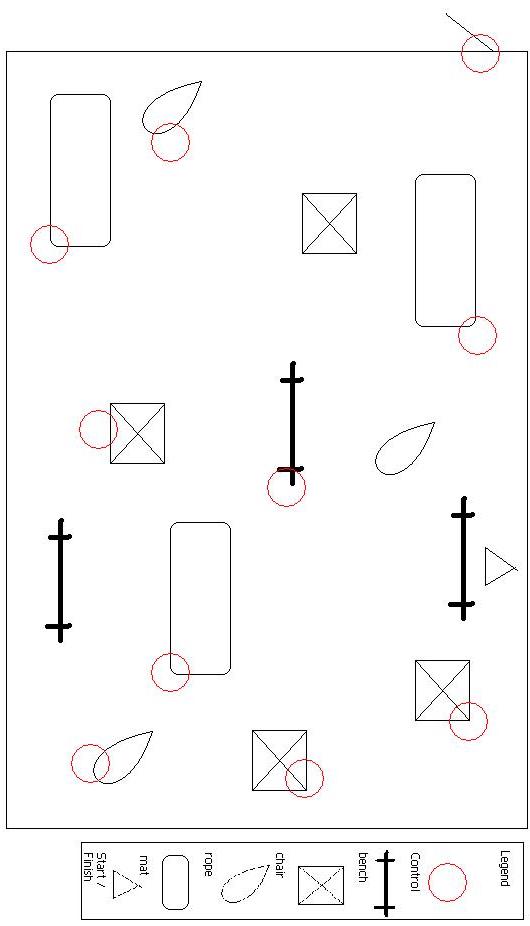
Example Indoor course of a gymnasium.
The controls can be numbered in which ever way you like. The controls
can be collected in any order. A number of courses can be set from
this master map.
| Review skills and concepts (R) - Lesson Three | New skills and concepts (NSC) | Major teaching points (MTP) | Organizational teaching strategies or styles (OTSS) |
| 1. Pacing
2. Compass Orienting |
1. Memorizing control locations
- Memorizing control locations allows you to run in the direction of the control without continually checking your heading. - This will save you time. 2. Trusting your teammates
|
1. Use obvious markers to establish a reference point.
- the control is to the left of the giant rock, stream, stump, etc. 2. Rely on your memory while making your way toward the control.
3. Introduce the rules of Orienteering. |
Entry: Can orient using a compass.
Can use the compass to orient and move in a specific direction. Understand
that geographical directions are fixed and can be used to orient oneself
on a map.
Exit: Establish team trust and application of memory and rules to the problem of running and orienteering course. Warm-Up:
1. Orienteering Rules: Major concepts- you
must use the map to get to each point IN ORDER, you cannot follow anyone,
use your compass, and complete the course as short a time as possible.
2. Handout: of Rules
Exam and Rules
Handout.
|
|
Taken from the NCCP Level 1 Coaching Manual pg. 7-8
Ø Competitors must take the controls in the specific order. Ø A participant who misses the assigned start time may start later, but the time will calculated from the original start time. Ø Immediately after crossing the finish line the competitor must hand their map and control card to the official this will eliminate concern and possible searches for orienteers presumed lost or injured when they neglect to report to the Finish. Ø If competitors give up before completing the course they must report back to the Finish officials and hand in their map and control card. Ø Orienteers should not follow other competitors in hopes of improving their time, will be disqualified if do so. Ø Upon completing their course competitors should not divulge information about the map, terrain or course to a competitor who has not yet started Ø Competitors shall not enter the competition area prior to an event in order to obtain knowledge about the terrain, vegetation, etc Ø Orienteers shall not damage any property eg. fences Safety Rules: Ø Whistles must be carried during events Ø The international distress signal (3 blasts of the whistle) should be familiar to all orienteers. Ø Athletes must not attempt to cross areas marked uncrossable such as ponds and lakes. Ø Competitors must aid injured orienteers they encounter. Ø Information to aid a lost orienteer such as a safety bearing
must be provided.
|
| Orienting Rules Quiz
Name:
True or False:
1)____The orienteer may follow another competitor provided that he does not communicate verbally with him. 2)____An orienteer shall be disqualified for not punching controls in correct order. 3)____An international distress signal is three blasts on the whistle. 4)____An orienteer may cross a pond marked uncrossable provided he or she feels that they can do so safely. 5)____A competitor who has not yet started is forbidden to gain knowledge about a course from a participant. 6)____If you come across an injured orienteer it is okay to continue on without assisting them. Short Answer:
1)Why is it important for a competitor to report to the Finish, even
if they do not complete the course?
|
| Review skills and concepts (R) - Lesson Four | New skills and concepts (NSC) | Major teaching points (MTP) | Organizational teaching strategies or styles (OTSS) |
| 1. Hand in take home exam.
2. What are the major rules. - use probing and hints - have an established level of understanding that must be met before the field event is attended. This ensures safety and provides legal coverage if there is an incident. 3. What methods made you more successful when you played the Master Map game? - team work - memorizing the control locations |
1. Thumbing:
-bend the map as you progress along it. - reduces confusion, as there are less things to look at. - a quick way of orienting on the run. - a way of reducing your time. - must memorize control location or will not work as well. |
1. Thumbing:
- use an indoor course, different than have used before. This is made easier if the teacher makes a master blank copy of the gymnasium layout and them draws on obstacles and control locations as needed. 2. Timed Outdoor Course:
|
Warm- Up:
Orbiter (an adaptation of musical chairs) 1. Thumbing:
|
| Review skills and concepts (R) - Lesson Five | New skills and concepts (NSC) | Major teaching points (MTP) | Organizational teaching strategies or styles (OTSS) |
| 1. Thumbing | 1. Route Planning:
- the line of least resistance. - not the same for everyone. - what are the influential factor? (speed, agility, sense of direction, endurance, performance under pressure). 2. Map Symbols:
|
1. Route Planning:
- how to get there the fastest. - what is the best route for you? - this feeds into the C.A.R. concept being introduced in lesson six. 2. Map Symbols:
3. Whistles:
|
Warm-Up:
Card Relay: 1. Route Planning:
|
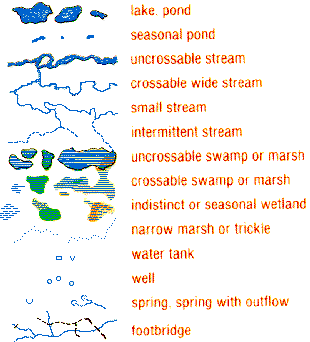
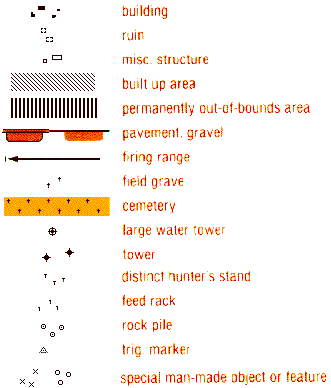
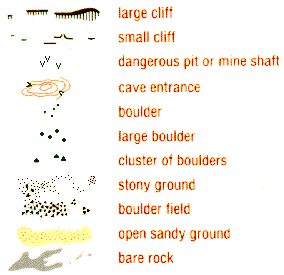
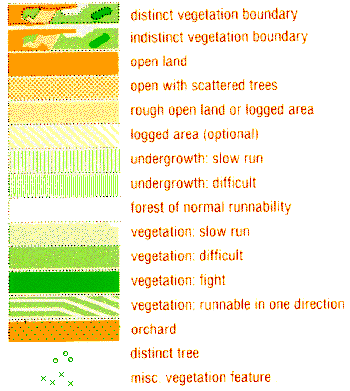
|
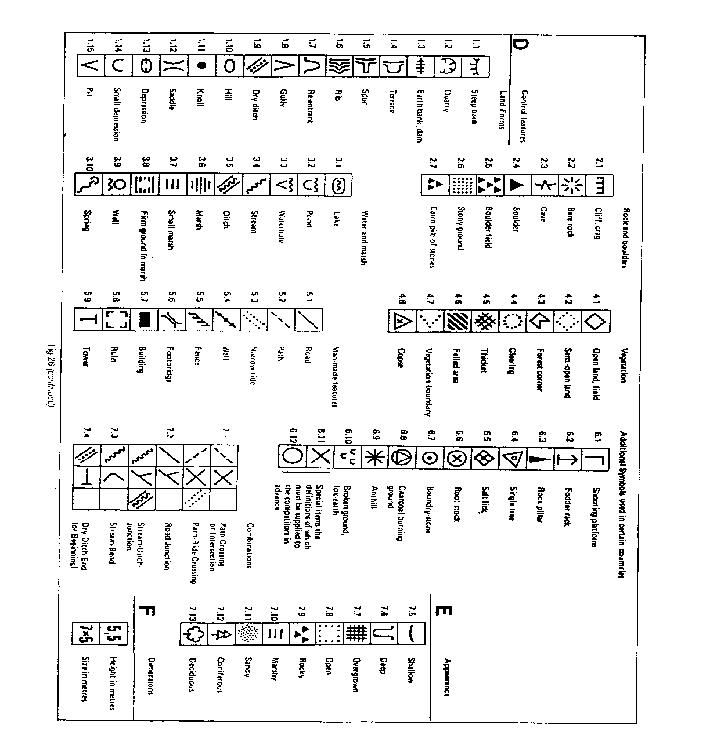
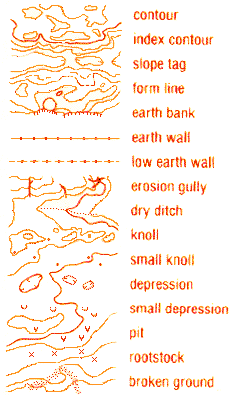
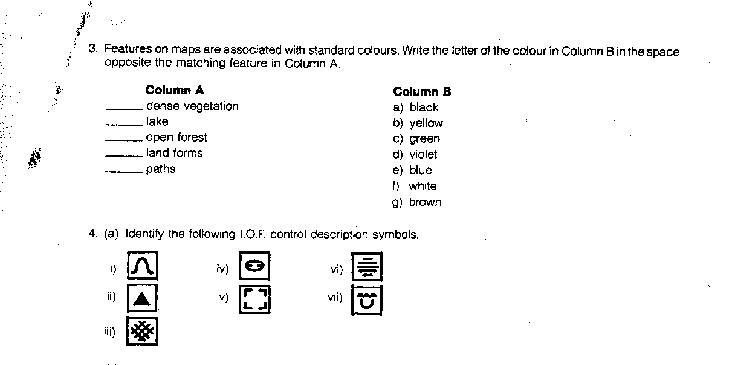
Taken from page 29 of the Orienteering Level 1 Coaching Manual.
Linear Features:
Other Man Made Features:
Rock Features:
Vegetation:
|
|
Name:
True or False:
1)____The symbol 2)____The symbol 3)____The symbol 4)____The symbol Short Answer: 1)What is the difference between the symbol for a road and a trail?
2)The tree cluster and single tree symbols look very similar but they have one difference, what is it?
|
| Review skills and concepts (R)
- Lesson Six |
New skills and concepts (NSC) | Major teaching points (MTP) | Organizational teaching strategies or styles (OTSS) |
| 1. Route Planning
2. Map Symbols
3. Where's your WHISTLE |
1. C.A.R.:
- think in this order: - Control site, the feature (knoll) - Attack point, (parking lot) - Route, route choice (up the road) 2. Spelling in PE:
3. Why Whistle?:
|
1. C.A.R:
- use knowledge of map profiles and features to establish where the Control is located. - What general easily identifiably area are you aiming for? (Attack Point) - The path you will pick to get there. (Route choice) 2. Guest Orienteering Expert:
3. Why Whistle?
|
Warm-Up:
Crows and Cranes: - Students find a partner and name themselves or cranes. - The birds will line up parallel each other with home bases on their side of the gym approximately 20m away - The teacher will call out either crows or cranes. - If "crows" - these students will move (walk, jog, run) to their home base. The cranes will move at the same speed as the crow, but try to tag them before they cross the end line. - Keep score of all the time tagged. -Vise verse if "Cranes" Command 1. C.A.R. - The expert will describe the concept. - After each letter is explained there will be a brief question period and then a drill to get the point across. Practice Drill "C": - have students stand in the centre ring of the gym. - have them run to the location where the control is located, teacher calls it out and everyone runs to that location. - ex/ East basketball hoop. Command Drill "A": - supplies, blank sheet of paper, and pencil. - Divide the class into four groups, have each group run to a certain attack point, then return to the centre circle, to draw as many of the controls as they can remember. - the persons sheet remains in the centre of the circle, face down, and can only be added to during the limited 30 second "drawing" period. - at the attack point there are several controls - the person in each group with the most correct controls is the group champ. Self Check Drill "R": - Set an obstacle course and dictate the way students must complete the obstacle. - Use many different ways of maneuvering over the obstacle. - Set limits, the blue mats are deep water, ropes are snakes, etc. - Ask at the end what was the easiest of the ways to get through the obstacle course. - Pose the question what would be the easiest way to get to the other side of the gym (looking for route planning, go around rather than through). Command, Guided Discovery |
| Review skills and concepts (R)
- Lesson Seven |
New skills and concepts (NSC) | Major teaching points (MTP) | Organizational teaching strategies or styles (OTSS) |
| 1. C.A.R.
2. When should the whistle be used? |
1. Traffic Light:
- The colour coding that is found on orienteering maps that dictates difficulty of terrain. |
1. Traffic Light:
- Green: full speed, rough direction - Yellow: slow down, cautious movement and orienteering - Red: slow and care moving, precise direction. 2. Combining All The Pieces:
3. Route Assignment:
|
Warm-Up:
and 1. Traffic Light: 2. Combining All The Pieces:
|
| Review skills and concepts (R)
- Lesson Eight |
New skills and concepts (NSC) | Major teaching points (MTP) | Organizational teaching strategies or styles (OTSS) |
| 1. Traffic Light:
- red light, yellow light, green light go |
1. The Real World Application:
- purchase maps of park or field from park managers. - pick a location that is reachable in the class period for a 20 minute O-event, and 5 minute stretch. |
1. Real World Application:
- use the skills and abilities you have learned in a new environment. - Whistles are for emergency only. |
- Maps and whistles will be handed back to students. Plastic
bags for maps if conditions wet.
- A start line will be established. Warm-up: - Jumping Jacks, abduction of leg version, flexion of the leg version. - Running on the spot with high knees - Burpees, 5-10 - Push-Ups 5-10 - Jog/Run intervals to tree and back, or an approximation. - Stretch all muscle groups that feel stiff. Some teacher lead but mainly student discretion. Command 1. Real World Application: - At the start line students will be given a compass and the number of that compass recorded before they are released. - Release students at 30 second intervals with the knowledge that they have only X minutes to complete the course. - Students can be released at the same time if they are running different courses. Self Check. |
| Review skills and concepts (R)
- Lesson Nine |
New skills and concepts (NSC) | Major teaching points (MTP) | Organizational teaching strategies or styles (OTSS) |
| 1. Display recorded times and people who ran each course.
2. Have those people who ran the same course compare and discuss routes and what the best line seemed to be. |
No New Concept | 1. Trying the Next Level Up:
- students will be grouped by the course that they ran in Lesson 7. - Students will then pool their resources and devise the best route for them for the next hardest route utilizing ideas from all students. |
Warm-Up:
Balls, Balls Everywhere! 1. Trying the Next Level Up:
|
| Review skills and concepts (R)
- Lesson Ten |
New skills and concepts (NSC) | Major teaching points (MTP) | Organizational teaching strategies or styles (OTSS) |
| None | None | 1. Organize the transportation, map handouts, and equipment check of the class. | Go get 'em tigers or tigerets |
Content Analysis of Major Psychomotor and Cognitive Subject Matter:
Psychomotor
| Skill | Key Elements |
| 1. Running:
Anaerobic and Aerobic Fitness 2. Pacing:
|
1.
Orienteering is an endurance sport in which you are timed on how fast you can complete the course. Therefore it is important to develop both the anaerobic and aerobic systems of the body. The better shape you are in the less tired you will be and therefore the more confidently and accurately you will read the map and find the controls. 2.
|
Cognitive
| Skill | Key Elements |
| 1. Orienting the Map
2. Orienting Yourself with the Map
3. Route Planning Techniques:
|
1.
Making sure the map is facing the right way. To orient the map, you must line up your compass with the arrows on the map. The arrows on the map always indicate which way north is. 2.
3.
4.
Catching Feature - A large outstanding feature situated across the line
of travel on route to, or beyond the control. When situated in front
of the control it alerts the orienteer that he or she are nearing the control.
When situated beyond the control it prevents the orienteering
Attack Point - An outstanding feature close to the control from which the orienteer can navigate to the control. 5.
6.
|
Cognitive:
The students will be timed early in the unit on a school course and then retimed again later on in the unit. They will be graded on their improvement. Why this will be used as assessment is that it shows the students ability to route plan and find the controls using the techniques of orienteering. The same is true for taking the time of the final orienteering event. The two take home quizzes (Rules and Map Symbols) will demonstrate the extent of the students knowledge in these areas.
Psychomotor:
The best way to assess the students psychomotor ability is by grading
their times in both the final orienteering event and the school course
(how much time they improved). It shows their aerobic and anaerobic
fitness level. The highest improvement times will receive the highest
grades.
|
First Time: Second Time: Second from First (improvement):
|
Cognitive:
This could be assessed by class attendance record, gym strip, group
cooperation, willingness to help out (setting up and cleaning up equipment)
and overall attitude/effort.
Table
of Contents:
Command Style:
The purpose of this style is to learn to do the
task(s) accurately and within a short period of time, following all decisions
by the teacher. This type of teaching will be used to demonstrate skills
and to set up drills, but it will be used sparingly because students learn
by actually doing the activity themselves. The only time we would really
use this is for the Aerobics warm-up.
Practice Style:
The purpose of this style is to offer the learner
time to work individually and privately. This style also provides the teacher
with time to offer the learner both individual and private feedback. This
type of teaching will be used when the students have learned a new skill
such as the underhand serve. The teacher will demonstrate the skill and
each student will have time to explore and practice the skill. There will
be a few minutes before and after each lesson for the students to practice
new skills or to get help with previously learned skills.
Reciprocal Style:
The purpose of this style is for students to
work in partners and to practice positive constructive feedback based on
criteria prepared by the teacher. This style will be used for almost all
activities because students get a chance to monitor the observers and give
feedback. By doing this they are able to understand the skill better because
before you can critic some one on a skill you need to understand the main
aspects and cues of a skill this be incorporated into most of the lessons.
The Self-Check Style:
The purpose of this style is for the learner
to perform a task and for them to evaluate their own work and skill assessment.
The teacher will prepare the subject matter and criteria answer any questions
by the learner and initiate communication with the learner to promote the
cognitive domain of teaching.
Inclusion Style:
This style is used when the students select a
level of a task that they feel that they can perform and they check and
evaluate there own work. This would be when the students are learning too
serve the teacher can have three different net levels for the students
to practice over.
Guided Discovery:
This style is used for the students to discover
a concept by answering a sequence of questions presented by the teacher.
The learner must listen to the teachers question of cue, discover an answer
for each question in the sequence and then discover the final answer, which
constitutes the concept sought. An example of this would be used in doubles
and singles strategies. The teacher could present a problem an easy example
would be if your opponents in doubles play are directly behind one another
on the court and far over on the right hand side of the court where would
you want to place the birdie?
Table
of Contents:
References
http://www.educ.uvic.ca/Faculty/thopper
http://www.freehomepages.com/cutebaby/Riddles/easy.html
http://www.scct.ac.uk/sports/orienteering/
Joleen Gudemond http://www.educ.uvic.ca/Faculty/thopper/Pe352/PE352%20unit%20plan.htm
Canadian Orienteering Federation.1983. Orienteering Level 1 Coaching
Certification. Coaching Association of Canada and Fitness and Amateur Sport,
Government of Canada.
Premiers Sport Awards. 1999. Orienteering. British Columbia
Ministry of Small Business, Tourism and Culture.
Diana Hocking and Carl Goger. 2001. PE 126 Class Material.
Larrys Brain
Kirstens Brain
Table
of Contents: