
Instrumental troubleshooting
contact | home | lab | links | opportunities | people | publications | research |
Introduction
Two lists: standard (and special) procedures, and problems we've encountered (and how to deal with them). Contact Scott or Ori if you've discovered a new problem.
MS procedures
Check out the TQD User Manual (![]() ) first. There is a printed copy in the lab. Also see the standard operating procedures page. Waters has a searchable page of articles that can help address problems that you can also consult.
) first. There is a printed copy in the lab. Also see the standard operating procedures page. Waters has a searchable page of articles that can help address problems that you can also consult.
Booking of instruments is done via the group's Team.
MS problems
- Scope stopped working properly
- Instrument fails to achieve vacuum
- Leaking / no spray / syringe plunger difficult to depress
- Source and desolvation temperatures are slow to (or don't!) respond to changes
- Lifetime of vulnerable parts
- Isotope pattern matching poor
- Plunger pushed out of syringe
- Calibration wildly off
- Full spectrum range not being acquired
- Collision gas readout unstable
- Capillary sparking
- No signal in negative ion mode (positive works)
- No response from capillary or cone voltage (stuck at 0)
- When acquisition occurs, signal disappears
- Backpressure on syringe, gas coming out of source, no signal
- Unidentified peaks in spectrum
- Chromatogram freezes
- PSI traces are spiky
- Finding parts
- MassLynx freezes
- Synapt: DriftScope will not open
- MassLynx: data files do not appear
- Synapt: ion current periodically dipping
- Synapt - most software or communication issues
- Synapt - no signal in MS tune window
- Synapt - "Source pressure test failure"
- Synapt - "Source pressure API gas trap trip"
- Synapt/TQD - "Turbo speed failure"
- Synapt - Accurary of m/z values is decreasing
- Synapt - Signal is becoming weaker or signal is becoming less consistent
- Synapt - Lockspray test fails
Procedures
1. Pressurization of the source
- With the mass spectrometer in standby mode, replace the regular glass source housing with the plastic housing that has been modified with a pressure gauge. Be sure to reconnect everything.
- Attach the nitrogen line to the plastic housing via one of the available ports. (The nitrogen line you’re looking for is connected to the pressure meter built into the desk. ‘Gas 1’)
- Set the cone gas and desolvation gas to normal operating values, then increase the external nitrogen flow into the source until the pressure gauge reads +4 in. H2O.
- Flush the source in this manner for at least 10 min.
Adjust the external nitrogen flow so that the pressure gauge reads a positive pressure of 1 in. H2O. - You are now ready to run your sample. If you still see evidence of the presence of oxygen, return to flushing the source with N2.
- After you’ve finished running your sample, there are two states in which the source can be left:
i) Turn the external nitrogen off, turn the instrument to standby and replace the regular source housing,
ii) OR, Increase the pressure back to 4 in. H2O then disconnect the waste line and in its place put a white plug. This will maintain the oxygen-free atmosphere overnight. To insert the plug you will have to simultaneously reduce the flow of nitrogen so that too much of an over pressure is not generated. Once the plug is in place adjust the nitrogen flow so that just a slight overpressure is maintained.
(Krista Vikse)
Problems
1. Problems with the scope on MassLynx, it has suddenly stopped working, responding to changes in settings, etc. The instrument is running fine because when can acquire a spectrum as normal, and in MCA format the scope operates normally. However, on terminating the acquisition the scope freezes with the last spectrum on display.
The problem may be a corrupted "peak config" file - so close Masslynx, and look in C:/temp for a file called peak config.dat. If it's not in the C:/temp directory, try a search. When you find it, delete it (or if you prefer, rename it to (i.e. oldpeak config.dat), then restart Masslynx (this file is recreated if not already present each time MassLynx is launched).
(Brian Fowler)
2. Instrument fails to achieve vacuum on pumping down after venting (amber light on).
Check the vacuum gauges. The green light will replace amber if the Tof Penning gauge drops below 2 × 10⁻⁶ mbar. If the gauge reads e.g. 6 × 10⁻⁹ mbar, it is malfunctioning. Try switching the collision gas on and off to provide a minor “jolt” to try and startle it back into life. If this doesn’t work, remove the cover by removing the three screws on the back top edge of the machine (only part way, so the inside of the instrument may be accessed from the back). Check that it is the gauge that is malfunctioning by swapping the Tof and Analyser cables and looking at the gauge readbacks – the readings should have swapped. Remove the cable from the Tof Penning gauge (large red cylinder), and turn the gauge head a quarter turn and remove. Tap the protruding metal probe with a screwdriver handle; this vibration may free buildup of deposits inside the gauge. If this doesn’t work, vent the instrument and remove gauge entirely at the first O-ring clamp, and install a replacement. Pump the instrument back down; this ought to fix the problem.
Clean the offending gauge according to the manufacturer’s instructions, and check the spark gap (should be 0.25 mm).
(Waters Help Line, 320626)
Addendum: if you reassemble the
source after cleaning, and there is a loud hissing,
and the MS not only fails to achieve vacuum but gives
up after a couple of minutes, you've misplaced an
O-ring. Reassemble the source correctly!
(Matt Henderson)
Addendum #2: It's also possible that the O-ring has hardened and flattened, and no longer seals properly. If the inner edge of the O-ring groove is protruding beyond the O-ring, it has likely flattened and should be replaced (you will probably find it brittle upon removal). Basically: if the O-ring looks less than perfect, replace it!
(Lars Yunker)
3. Leaking upon
sample infusion / no spray / syringe plunger difficult
or impossible to depress.
Tighten the PEEK fittings, try infusing
sample again manually. If it is difficult or impossible
to depress the plunger, there is a blockage. Remove
the PEEK fitting at the probe, and try to infuse
again. If the solution exits the PEEK tubing freely,
the blockage is in the stainless steel capillary
inside the inlet; clean according to the manual.
If the solution does not exit the tubing, the blockage
is in the PEEK tubing. Reverse; this will usually
clear the blockage. If not, trim the PEEK tubing
using a sharp knife (remove say 5 mm from the end
originally nearest the syringe).
(Scott McIndoe)
4. Source and desolvation temperatures are slow to respond to changes.
The source T always responds slowly; be patient. Desolvation T should be fast. The system can sometimes be shocked into responding by setting the T much higher than that desired, then when the readback hits the desired level, reset it to that value. Check that the value holds. Tech Support suggest putting the machine into standby, closing MassLynx, switching off the electronics at the back of the instrument for 5 seconds (don’t leave off for >20 seconds or the machine will vent), rebooting the embedded PC, waiting 2 minutes, restarting MassLynx then back into action.
This did seem to improve the response. However, response did not kick in for either source or desolvation T until 150°C, at which point response was accurate. Changing the gas flow rate speeds up the rate of change in desolvation gas T.
(Waters Help Line, 322601)
If the above doesn't work, switch the source (below) to a different source. If that works, chances are the heater is broken in the source. Original source will need fixing.
(Anuj Joshi)
5. Lifetime of vulnerable parts
Lifetime of turbomolecular pumps and MCP both about 2-4 years on average. Cost of replacement: about $12,000 for turbos, $6,000 for MCP. Also: engineers advise that roughing pump can cause more problems than turbos (about $4000).
(Bob Harrison)
6. Isotope pattern matching poor, especially re: the lower intensity peaks in the pattern. Related to this problem: appearance of strange ghost peaks that appear even when the MCP is reduced to 0 V.
The ghost peaks are an artifact from the pusher. The pulse width setting is usually 9 ms; try lowering to 7 or 8 ms to try and eliminate this. The TDC settings (access from the Tune page) can be altered to improve isotope pattern matching; in particular the Stop setting. Most of the thresholds are set to try and eliminate noise, but can be usefully set to 0 especially when getting patterns for low intensity ions.
A further note on isotope pattern matching. If your ion current is very strong, you will inevitably get poor pattern matching and mass accuracy will also be compromised. This may be solved by diluting your sample or detuning the position of the spray capillary (wind it away from the cone using the black dial on the far side of the source. NOTE! Return the spray head to the tuned position after detuning!
(Waters Help Line, 342461)
Addendum: the main cause of isotope pattern mismatching is actually degradation of the MCP detector. During the performance maintenance kit installation, we found that the MCP voltage had to be increased to 2700 V to maintain the same performance as was previously obtained...
(Brian Fowler)
7. System was working fine, but when the syringe was removed from the syringe pump, gas pressure forced the plunger back and out of the barrel, expelling the contents. Solvent could still however be forced through as usual, and the spray appeared normal. If the API gas was turned off and an empty syringe attached, nothing happened, then as soon as the API gas was turned on, gas pressure started to force the plunger out. Turning off the API gas immediately stopped this (so it seemed as if the vent behind the baffle was not plugged).
The probe was removed and the plastic ferrule/steel retainer/capillary
assembly was removed and clean solvent passed through the system - solvent could be seen coming out from both the tip of the capillary and partway along. Replacing stainless steel capillary solved problem.
(Evan Crawford)
8. Calibration wildly off after changing ionisation modes or between projects.
Check that Lteff is the same for everyone. If you collect data using a different value from that which the machine was calibrated for, your data will be badly wrong.
(Brian Fowler)
9. When "Acquiring" a spectra, or even just observing a sample in the tune page, sometimes the m/z range does not go as high as the settings dictate. For
example if the m/z range is set to acquire between 50 and 3000, sometimes only up to 2100 m/z will be collected, and nothing at all
will appear between 2100 and 3000 (not even noise).
Click on the
TOF tab. Near the bottom, just above the MCP voltage, there is an option for
a "Manual Pusher" with a little white box beside it. Make sure this option is
NOT checked. If it is not checked, the m/z range should go as high as
specified; if it is checked the m/z range will be problematic.
(Matt Henderson)
10. When checking the Analyser Penning gauge or
the gas cell dial on the front of the instrument,
the readout continuously decreases.
This will generally
be seen after adjusting the gas cell dial on the
instrument. When the dial is pulled outward (to unlock
it) there is usually a quick increase in the gas
pressure. This can give a misleading reading after
the adjustment and take a long time to drop to the
actual setting. To get a more accurate result, click
the collision gas button off for a few seconds and
back on. Allow 10-20 minutes for the reading to stabilize.
(Jen Pape)
11. Small blue sparking can be noticed at the end of capillary, it will not disappear if you inject different solvents or air (turn off the room light to see the effect more clearly).
This plasma discharge is caused by a microscopically sharp
point on the end of the capillary. Change the capillary or use sand paper to gently polish the capillary, by polishing the capillary, put the sand paper 90 degree against capillary to make sure the end of capillary flat.
(Jingwei Luo)
12. The signal in negative mode disappears within 5 minutes, and there is no signal if you change solution to NaI. But if machine is set to positive mode, the signal goes back to normal.
Solved by polishing the rusty adapter nut. Check MicroMass Z-spray API Source User’s Guide page 78 for this component.
(Jingwei Luo)
13. No response from either the capillary or cone voltage (both stuck at 0).
This is a problem with the safety interlock, and most often happens when swapping between different glass source housings. Remove the glass cylinder and make sure the small knob near the back screw was aligned and depressed when the probe casing was replaced. The knob position can be adjusted with a screw driver.
(Jessamyn Logan)
Obtain a safety interlock from Ori (the one that simulates all the settings that bypass all the safety interlock in the system) In our case, this worked and the system responded, proving that the problem indeed had to do with the safety interlock in our system. The parts illustrated below indicated with the blue arrows were taken apart, and the white coating on the parts were thoroughly scrubbed and removed with distilled water.
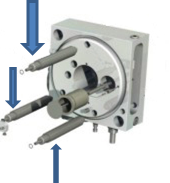
The safety interlock was removed by unscrewing and was also thoroughly cleaned with distilled water. Everything was dried and put back together, cone and capillary voltage responded accordingly.
(Anuj Joshi and Alan Wei)
14. When acquisition occurs, signal disappears.
Set mass range to m/z 50-2000. Instrument does not perform well at high mass ranges.
(Ori Granot)
15. Backpressure on syringe, gas coming out of source, no signal
Check the exhaust line. The white screw on front of instrument should be fully open under normal operating conditions. If it is, check the line that goes to waste; it should be free of any solvent or debris. Anything in there must be cleared before running any further samples.
(Natalie Dean)
16. Unidenfied peaks in spectrum
Check what anyone put through last, or even last week! Waters has a nice table of common background ions.
(Scott McIndoe)
17. The chromatogram freezes after a minute and no data can be recorded. Every other window i.e the tune page and spectrum also freezes.
Reboot the embedded pc in the QTof (check the user manual for details). Ping the internal pc and establish a communication with a internal pc. Then use telnet and just type reboot. You will hear a beep sound. Open the MS-Tune again and the problem is likely to be solved.
(Anuj Joshi)
18. You are running a PSI reaction on the TQD and the species of your interest or/and the TIC looks (extremely) spiky.
Answer: You have a plumbing problem!
1: Check for blockage in PEEK tubing.
2: Check for blockage in SS capillary by cleaning it with the sonicator. You can also turn off the instrument and the API gas to see if droplet is coming out from the capillary tip. Also check for bending/crushing of capillary.
3: Rinse the sample cone (standard cleaning procedure)
4. Check unions - an unblocked union has a tiny hole when you peek through it. When you cannot see through the union, there is a blockage. Sonicate the union in HCl. Don’t use a disposable needle to poke the union, it will break it. Ask senior lab members, Scott or Ori for help.
(Michelle Ting)
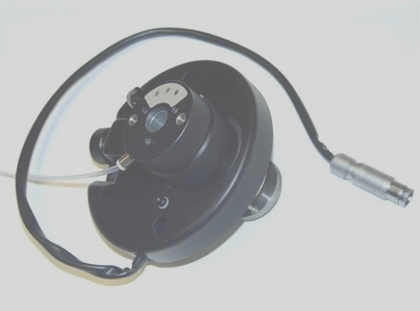
19. What's this part? Am I missing something during assembly?
Waters has a graphical parts locator, that gives you very helpful pictures like this one:
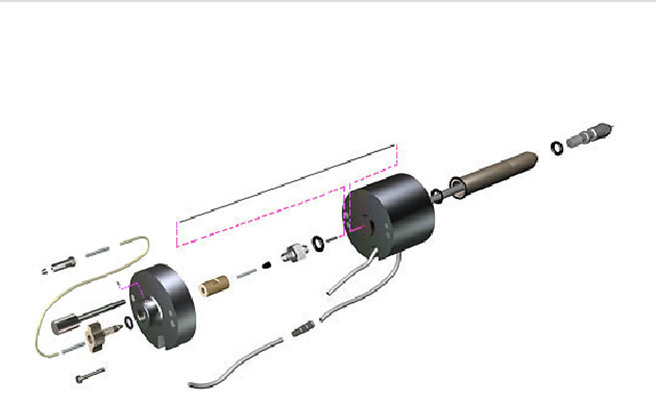
(Michelle Ting)
20. TQD - MassLynx freezes, and MS Console reports a communication failure.
Solution: Reboot the instrument. This is the solution whenever the Tune window fails to respond or MassLynx fails to initialize. Follow the reboot instructions on p37 of the operator's manual.
(Ian Chagunda)
21. Synapt - DriftScope will not open.
Uninstall DriftScope by using the Windows “Programs and Features” facility in the Windows Control Panel. Delete the 'C:\DRIFTSCOPE' folder following removal of the software. Then reinstall DriftScope using the CD labelled DriftScope v2.9.
(Dr Peter Williams)
22. TQD - The data files created for MS (MassLynx --> Open project --> File Name) does not appear on the spectrum data browser when trying to acquire data
The reason might be that the instrument cannot track 'too lengthy' file names which were saved under the data folder. This problem was solved by giving simple file names which has a few characters (less than 6 letters/symbols) for the MS file. Therefore, in order to avoid this problem, a simple file name should be given to the data file.
(Nadini Thushara)
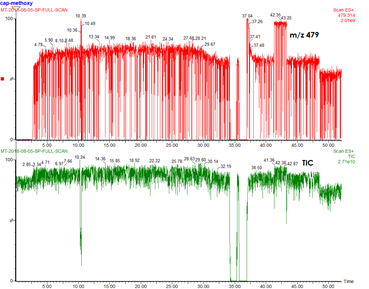
23. Synapt - Ion current glitching
Very stable signal, except for a couple of seconds every ~1.3 min, where we see a sudden drop in intensity (see figure below).

We asked the Konermann Lab and they said they had seen a similar problem. In their case, it was solved by opening the instrument and examining the LED lights representing each of the boards. An orange or red LED suggests a problem with that board. In our case, they were all green. The Konermann lab had to replace the faulty board (6-9k, obtained from Waters).
(Professor Lars Konermann)
We found the problem was just that the trap gas supply had been reset a little too high (10 psi instead of 7 psi). That was enough to cause periodic venting and the pressure surges that we saw. Turning the trap gas supply on the argon cylinder down to 7 psi solved the issue.
(Dr Peter Williams)
24. Synapt - most software or communication issues
Close MassLynx. Toggle the "EPC" breaker (green) at the back of the instrument and wait 2-4 minutes. The Synapt light indicator will briefly flash white once communication has been re-established. See if the host and instrument computers are communicating by typing "ping -t epc" into the "Run" window of the host PC. Once communication has been established, open MassLynx and the indicator light should become blue. This will usually solve the problem. If this fails however, carry out the same procedure, but after closing MassLynx, reboot the host PC before toggling the "EPC" breaker. This will solve most other problems. See the operator's manual, page 60, for more details. If this does not work, consult the manual/Waters for help.
(Dr Peter Williams)
When you are finished with the SYNAPT, DO NOT SLEEP the computer after you are done. Just put the SYNAPT on stand-by and close MassLynx. Sleeping the computer causes many communication errors between the SYNAPT and HPLC/PDA systems and is a pain to reestablish the communications with all the machines afterwards.
When PDA is on and MS Console would not run, it throws this error below:
System.NullReferenceException: Object reference not set to an instance of an object.
at Waters.ACQUITY.PDAFormManager.get_Image(). Solution: Close MassLynx and shutdown PDA then run C:\ProgramFiles(x86)\WatersInstruments\Bin\StopAcuityProcesses.cmd.
PDA communication failure after a few seconds even after resetting module in MS console. Solution: Close MassLynx and run C:\ProgramFiles(x86)\WatersInstruments\Bin\StopAcuityProcesses.cmd
- run C:\ProgramFiles(x86)\WatersInstruments\Waters DHCP Server Configuration and remove PDA network (ex// 192.168.0.4 W2998) from list then powered cycled PDA.
(Bragi Zhang)
25. Synapt - no signal in MS tune window
This is due to a communication issue between the internal computer (EPC) and electronics of the mass spectrometer. Close MassLynx and reboot the host PC. Set the pump override switch at the back of the instrument from "Auto" to "Override". This will stop the pumps from turning off, preventing vacuum loss. Turn off the "EPC" (green) and "Electronics" (red) breakers and wait 2 minutes. Turn the "EPC" and "Electronics" breakers back on and wait 2-4 minutes. The Synapt light indicator will flash white until communication has been re-established. See if the host and EPC computers are communicating by typing "ping -t epc" into the "Run" window of the host PC. Once communication has been established, return the pump override switch from "Override" to "Auto". Restart MassLynx and the problem should be resolved. For more details, see here.
(Dr Peter Williams)
26. Synapt - "Source pressure test failure"
First try opening and shutting the source door. This will cause the Synapt to repeat the source pressure test and usually solves the problem. If this does not work, try cleaning the door seal areas and shut again. If this does not work, consult the manual/Waters for help.
(Dr Peter Williams)
27. Synapt - "Source pressure API gas trap trip"
Ensure that the tubing from the instrument pilot valve is inserted firmly into the nitrogen exhaust trap bottle at the back of the instrument. This comes loose easily if knocked. If this is inserted firmly, ensure the API gas is ~7 PSI (0.5 bar, as recommended by the manual). Otherwise, consult the manual/Waters for help.
(Dr Peter Williams)
28. Synapt/TQD - "Turbo speed failure"
Most likely caused by pump/s failing, e.g. due to power surge. This will be obvious as the pump/s will not be operating. This will also mean the spectrometer will have lost vacuum and will no longer be operable. This applies to both spectrometers and it may happen to both at the same time, e.g. due to power surge. To fix this, set the instrument to "Vent" and then "Pump", found under "Vacuum". This will cause the pump/s to restart and begin to restore vacuum. Turn the API gas off and collision gas on to speed up vacuum restoration. The instrument will become operable again once when ToF pressure <1.2E-6 (Synapt) and ToF pressure <E-3 (TQD). This can be monitored by looking at the "Vacuum" tab, found under "View", but typically takes around for the 6 hours (Synapt) and 30 min (TQD). For more details see here.
(Dr Peter Williams)
29. Synapt - Accurary of m/z values is decreasing
Run a "Calibration Check" under "MS console" in "Normal Mode". If the check fails, run a "Calibration Setup" under "MS Console" in "Configuration Mode". This will calibrate the instrument and improve signal quality. Calibration requires a calibrant solution of 10% HCOOH:0.1 M NaOH:MeCN 1:1:8.
(Dr Peter Williams)
30. Synapt - Signal is becoming weaker or signal is becoming less consistent
Run a "Detector Check" under "MS console" in "Normal Mode". If the check fails, run a "Detector Setup" under "MS Console" in "Configuration Mode". This will optimise the detector voltages and hopefully improve signal quality. Detector checks/setup requires a lockspray solution of 200 ng / L LeuEnk solution in 0.1% formic acid/1:1 MeCN:H2O. For more information on detector failure troubleshooting see here. For more information on making the lockspray solution see here and here.
(Dr Peter Williams)
31. Synapt - Lockspray test fails
The lockspray system seems temperamental and will aim to fix this in time. If possible, use the sample flow control as a substitute. Detector checks/setup requires a lockspray solution of 200 ng / L LeuEnk solution in 0.1% formic acid/1:1 MeCN:H2O. For more information on detector failure troubleshooting see. For more information on making the lockspray solution see here and here.
(Dr Peter Williams)
32. Instrument does not show up in MS console and the console is blank
Run StopAcuityProcesses.cmd and StopMasslynxProcesses.cmd if possible located in C:\Program Files (x86)\Waters Instruments\Bin. Look at the xml files present and within folder in C:\MassLynx\IntelliStart\Configuration. If any are blank or look funny make a temporary copy elsewhere and replace them.
.
(Bragi Zhang)
© JS McIndoe, Department of Chemistry, University of Victoria · Updated 27 May, 2025