Lab 1/4
Due Oct 7, 2020. Please read the complete Lab before you start.
For information about the final project
CSC 100: Lab 1
Web Page Design and Publishing
Contents
- Learning Objectives
- Learning Outcomes
- Getting Started
- Problem Statement
- Part 1 (50%)
- Part 2 (50%)
- External HTML References
- How to Submit Your Lab
Learning Objectives
This lab is designed to teach you how to prepare and then publish simple websites using HTML. Using the World-Wide-Wide technologies, it is now feasible to create sophisticated multimedia documents, with text, images, audio and video, to be distributed and shared across an organization or the globe. Web publishing is becoming an emerging trend where scientists and engineers, students and teachers, friends and families, can exchange their photos, ideas, designs, products, and experiences.
Learning Outcomes
After you complete this lab, you will be able to
- create and edit a simple, but elegant, Web document viewable by all browsers,
- create hyperlinks and connect multiple related web pages into a single document,
- make changes behind-the-scene in the HTML source text,
- use Cascade Style Sheet (CSS) templates to layout Web pages,
- embed text, images, audio and youtube video inside a Web document,
- resize images and finally
- publish your web document to a web server so that it can be viewed by others.
Key concepts to discover are:
- What is a text file?
- What is the main difference between a text editor and a word processor?
- What is a pathname and a relative pathname?
- What is a directory or folder?
- What is a hyperlink tag in HTML?
- What is a URL?
- What is a Cascade Style Sheet (CSS)?
- How does HTML deal with the issues of page layouts and text contents?
- How are images and videos stored inside an HTML document?
- What is the difference between local and remote hyperlinks?
- What is the main difference between desktop publishing and web publishing?
- What is the difference between a web client and a web server?
- What is File Transfer Protocol (FTP) internet service? What is Secure FTP (SFTP)?
- What is a SFTP client? What is a SFTP server?
Getting Started
Download all necessary applications on your computer from
here:
Download Chrome, as browser.
Download Sublime, a tex editor.
Download Fotor, a photo editor.
Download Miro, a Video Converter.
Download Cyberduck, a Secure File Transfer Protocol (SFTP) client.
Download Remote access (VPN) in order to upload your site to the UVic web server. Note that you don´t need this if you are on campus.
We will show you in class how to install these applications. The
applications include a text editor (Sublime Text 3), a browser (Chrome),
an image viewer (Preview or Fotor), a file transfer application
(Cyberduck) and a video converter (Miro Video Convertor).
For editing HTML and CSS files, we recommend using Sublime Text 3 on
both OS X and Windows. Please don't use any word processors, e.g.,
Microsoft Word, OS X TextEdit, OS X Page. You will regret it if you do!
Sublime Text 3 will remind you to purchase an upgrade every so often.
You can just click Cancel and continue to use for free.
For image editing and resizing, we recommend using the native Preview application on OS X, and Fotor (A Microsoft Store App) for Windows.
We recommend all students installing the Chrome browser for testing your webpages in addition to Safari on OS X and Internet Explorer (or Edge) on Windows. Our Teaching Assistants (or markers) will use primarily the Chrome browser for evaluating your assignment submissions.
Lab 1 Related Files
Following these instructions on how to get a copy of all related files for this lab:
- create a folder on your Desktop called
csc100(all lower cases with no white spaces); - download a copy of lab1.zip here into the folder
csc100; - on Windows laptop, right-click
lab1.zipand then chooseExtract All ...which will create a default folder calledlab1insidecsc100folder; - on Apple OS X laptop, just double-click
lab1.zipwhich will create a default folder calledlab1insidecsc100folder.
Inside this lab1 folder, you will find the following files:
csc100.html--- this is a sample HTML file for testing part (1),index.html--- the first HTML file for part (2),places.html--- the second HTML file for part (2),style.css--- the CSS template for part (2),part1.txt--- additional instructions for stylingcsc100.html, and- a collection of miscellaneous (
.jpgand.png) images for part (1) or part (2).
There are also many online how-to videos related to our labs here to help you.
Problem Statement
All labs must be completed individually. There are two parts in this lab.
- (50%) For the first part, each student is required to create an HTML
document from scratch and then publish it to our uvic's web server,
studentweb.uvic.ca. You should change the write-up and/or images. (We will discuss later on this document what it is going to be about) - (50%) For the second part, each student is going to prepare another more sophisticated HTML document using a pre-defined CSS template. (We will discuss later on this document what it is going to be about. Hint: Superheroes!).
Part (1) is designed to teach you about:
- what an HTML file is and how to create it,
- what the basic HTML tags are,
- how to perform simple editing to your images,
- how to prepare a simple HTML document with text, images and videos, and
- how to publish an HTML document to a web server,
- what file transfer means between two computers.
Part (2) is designed to teach you about:
- what a Cascade Style Sheet (CSS) is,
- how to use a pre-designed CSS template,
- how to use a browser's developer tool to view various layout elements,
- what hyperlinks are and how to use them,
- how to prepare a multi-page web site, and
- how to publish a more professional looking website with multiple files.
The Challenge for Part 1 and Part 2
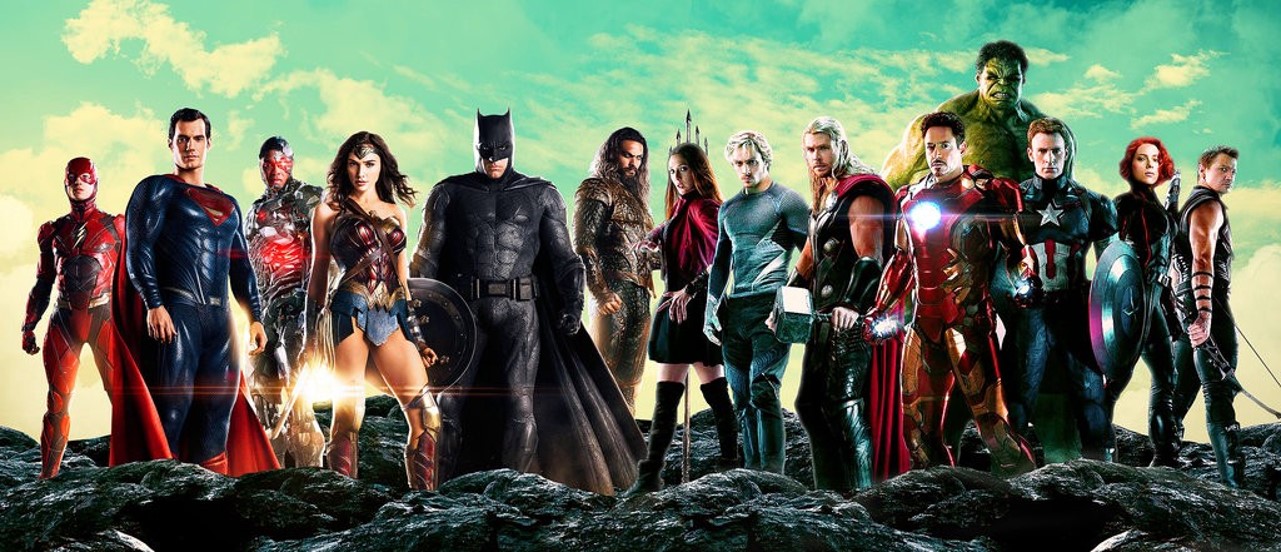
You have received a request to help a Superhero from DC Comics or from Marvel Comics worlds. (You can be inspired and work on another superhero, there are many real ones in the new world).
Have you noticed that the film studios and production companies that create superheroes movies have created sites with great content about the films, but the superheroes do not have websites to promote themselfs as a public figure?
Your mission is to create and then publish a website for the superhero of your choice, from DC Comics or Marvel Comics worlds.
Before you start developing the site you need to develop a simple plan as follows:
1. Goals: Identify the target audience of your superhero based on his core values, interest, goals, and objectives. Think about the vision and mission of your superhero.
2. Landscape: Think through how you would like your website to be able to function. More specifically, what features need to be on your site? For this step it is helpful to create a SWOT analysis about the superhero, identifying their Strengths, Weaknesses, Opportunities, and Threats related to competition.
3. Aesthetics: What colors and images you want on your site? What kind of pictures would you use?
4. Human Computer Interaction: Action plans. How you want your audience directed through your website. By thinking through what pages you need and how they should be laid out, you will help ensure, early on, the good visitor experience.
 Click to zoom
Part 1 (50%). Creating a basic site for a superhero
Edit the file csc100.html under lab1 folder. (Note: Don't double-click on the file. It will be
open inside your browser. Instead right-click and then choose Open With Sublime Text. This is generally how you edit HTML files in OS X or
Windows.) Modify its content using Sublime Text
3. Don't use Textedit in OS X, Wordpad in Windows, or any word processor.
Just use Sublime Text 3 which supports
text highlighting for HTML files. (Note: Although Sublime Text is free to use, it does
occasionally ask you to register. Just click Cancel and move
on.)
On this opportinty you could copy some paragraphs or sentences from other websites. Your write-up doesn't have to be original.
Your Part 1 must include minimally the following basic HTML tags:
- <html> </html>
- <head> </head>
- <title> </title>
- <body> </body>
- <h1> </h1>
- <p> </p>
- <div> </div>
- <img>
- <br>
- <iframe> </iframe>
- <ul> </ul>
- <li> </li>
- <a> </a> (a hyperlink around some text)
- <a> </a> (a hyperlink around an image)
and finally, you must follow the instructions in part1.txt to add some simple style rules, including body, img, h1, and #myvideo.
Overall, there must be at least 3 large images (at least 600 pixel wide each) and one embedded YouTube video (use the default size from youtube) in your Part 1.
Download images from internet that are related to your write-up.
Resize/crop your images so that they are in correct width (at least 600 pixels) and aspect ratios using Preview in OS X or Fotor in Windows.
Save these images inside the folder lab1 folder. Choose and then embed
a YouTube video that is related to your superhero. Use the
default size that is provided by YouTube.
To change the video, select a video on YouTube, click on share and then click on embed, copy the code and replace the code included in part1.txt between "frame" and "/frame"
You must change the
content of csc100.html to reflect your superhero.
After you have completed editing this file, test it using your browser
on your computer. Then, you must publish your
completed part 1 to our UVic web server including csc100.html and all
its related images.
See instructions here for Windows.
Before using Cyberduck you need to sign up to activate your web hosting services
Use our recommended SFTP client, e.g., Cyberduck to publish your Part 1.
Our UVic web server is studentweb.uvic.ca. Login to studentweb.uvic.ca using Cyberduck.
You must publish your website under your UVic's personal www folder.
Transfer your computer's local
copy of lab1 folder to your remote www folder on studentweb.uvic.ca.
Your lab1 folder must include the file csc100.html and a collection
of related images.
To view your published webpages under your www folder on studentweb.uvic.ca,
please use https://studentweb.uvic.ca/~12345/lab1/csc100.html
and replace the user name 12345 with your netlink ID. Don't forget the ~ symbol!
The hostname is studentweb.uvic.ca.
Watch this online video about how to use Cyberduck to publish a website.
Note: if any of your images is missing after publishing, please check the following:
- Your image filename is spelled correctly, e.g.,
csc100.JPG,csc100.jpeg. Make sure that your filename is spelled consistently inside your HTML file and in thelab1folder. Windows is not case-sensitive; but web servers are! Filenames must have the same spelling exactly!!!
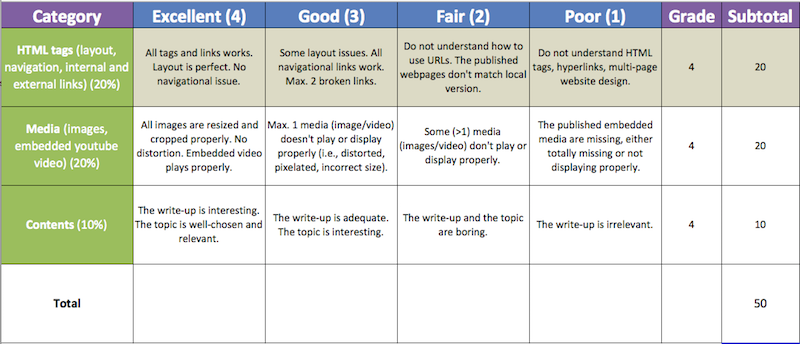
Complete part (1) first before proceed to part (2). Your part 1 is evaluated based on the following criteria:
Part 2 (50%) Create a website with CSS for the superhero.
This part is about how to use a free CSS (Cascade StyleSheet) template
to create a nice looking website. The CSS template is a file named
style.css. Do not change any of its
content. A CSS template is a stylesheet providing a standard
layout for several webpages. The layout has already been done for you,
so you don't need to make any changes to it.
Under the lab1 folder, there are two other HTML files, index.html
and places.html, already created for you. Please place any of your
new images under this folder as well.
Your are required to design a website about your superhero using
this pre-defined CSS template, style.css. You are required to change
the images and write-up for each subtopic, e.g., Home, places,
news and store *Base your selected subpages on the plan you developed in the begining of Part 1.
UPDATE: Make sure all the links inside your html files are https and not http. Check the fonts!
Only two, index.html and places.html, of these
four HTML files have been created for you. Complete the images and
content of these two files first. Then, just make copies of either
index.html or places.html to create news.html and store.html.
Change the images and content of news.html and store.html
accordingly. You are also required to hyperlink these pages together to
form a website; that is, all buttons should work when clicked.
For each webpage, there are 1 large image (1000 by 400) and 3 small
images (300 by 150). To complete part 2, you need to complete four
webpages index.html, places.html, news.html and store.html.
That is, you need to collect 4 large images (1 per page) and 12 smaller
images, (3 per page). Use images from your own collection or download
free ones online. Just make sure that your images are free of any
watermark.
For this , don't use any other free CSS template; just use the one that
we have provided, style.css. (We will show you how to change the
template in future labs.) When you are done with this part, publish the
entire website to studentweb.uvic.ca, similar to what you have done in part
1.
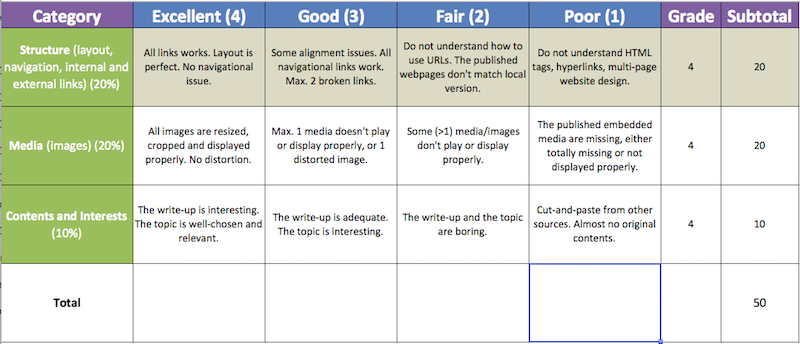
Your part 2 is evaluated based on the following criteria:
External HTML References
How to Submit Your Lab
When you are done with part (1), each
student is required to publish his/her version. Test your
published web reports on studentweb.uvic.ca with your browser, i.e., validate
its hyperlinks and contents, before you submit to Connex.
Login to Connex. Select CSC 100 Tab from the top. Choose Labs & Project from the side bar. Click Lab1. Follow the instructions
here.
In the Submission text box underneath the instructions, for example,
you just enter the following information for your part 1:
- Part 1: https://studentweb.uvic.ca/~netlinkID/lab1/csc100.html
- Part 2: https://studentweb.uvic.ca/~netlinkID/lab1/index.html
Replace the netlinkID with your netlink ID accordingly. Then, click
Submit at the bottom of the submission box before the deadline.
That is it! You're done.