CSC 100: Lab 2
JavaScript: Media, Slideshow, Maps and Social Network
Contents
- Learning Objectives
- Learning Outcomes
- Getting Started
- Problem Statement
- Part 1 (20%)
- Part 2 (20%)
- Part 3 (20%)
- Part 4 (40%)
- External HTML References
- How to Submit Your Lab
Learning Objectives
Today's websites are media-rich; they use images, video and audio to attract reader's attention. Our modern browsers have built-in capabilities that can display different image, audio, and video formats. Thanks to the HTML5 standard, a few media formats are becoming a standard on the WWW, e.g., JPEG, PNG, MP4, MP3, etc.
The original HTML standard has no support for dynamic content. With the addition of JavaScript, a standard programming language of the WWW, we can now develop JavaScript applications that can run inside almost all modern browsers, including Safari, Firefox, and Chrome.
This lab is designed to show you what JavaScript is and how to use it to develop a website that has images and mapping information. This is not a JavaScript programming assignment! We will not teach you how to program in JavaScript at all. We only want to show you how to use JavaScript code (provided by others) to create a dynamic website.
Learning Outcomes
After you complete this lab, you will be able to
- Create, resize, convert, and display standard HTML5 audio and video,
- Use JavaScript code to enhance your webpage design,
- Use Google maps to improve the usability of your website.
Key concepts to discover are:
- What is an audio/video file?
- What are the standard media formats?
- How are audio/video being included inside HTML5?
- What is JavaScript?
- How is JavaScript included inside a HTML document?
- How to add a Facebook-like button?
- How to add a slideshow in a HTML document?
- How is a location defined in Google Map?
- How to create hyperlinks to Google Map?
Getting Started
Download a copy of this lab here (lab2.zip). Unzip this
compressed archive into your csc100 folder on your computer, alongside
your lab1 folder. There are several files created for you. They are:
part1.html--- this is a sample HTML file for part (1), which is about audio and video;part2.html--- the second HTML file for part (2), which is about slideshows and Facebook button;part3.html--- this is part (3) which is about Google Map;part4.html--- a sample HTML file for part (4), which is about adding audio, maps, slideshows and Facebook button to your part 2 of lab 1;style.css--- a CSS stylesheet for part 4 of this lab;part2-js.txt--- this text file explains how to complete part (2);part3-js.txt--- this text file explains how to complete part (3);- a miscellaneous collection of images, an MP3 audio, and an MP4 video.
There are many online videos related to lab 2 available here.
Lab 2 (Templates, Inspecting, Media Conversion and Editing)
- make GIF like videos using Miro Video Converter
- convert or resize video formats with Miro Video Converter in OS X
- convert or resize audio/video formats with Miro Video Converter in Windows
- convert a MP4 video into MP3
- embed Google Map inside a web page
- trim and convert an audio to MP3 with iTunes
- trim a video with QuickTime X
- rotate a video with QuickTime X
- trim a video with Microsoft Windows 10 (Creator Update) Photos
- trim an MP3 audio with MP3 Cutter on Windows 10
- trim a video with Microsoft Movie Maker 2 (Windows 7 only) (Note: You may download a copy of Movie Maker 2 from Windows Live Essential 2012 . Don't install the whole package, just the Photo Gallery and Movie Maker is all you need.)
- rotate a video with Microsoft Windows Movie Maker (Windows 7 only)
- download videos from YouTube
Problem Statement
All parts must be completed individually. There are four parts in this lab.
- (20%) For the first part, you are required to create and publish an HTML document that uses MP3 audio and MP4 video. Please redesign this webpage so that it is about your favorite song and a home-made video about your pet/hobby. Use images/music/video that are not copyright-protected. (Note. You may use a MP3 extracted from your own music collections or download a free one from mp3juices.cc, but please trim it down to about 10-20 seconds. Don't post an entire piece of music. Make sure that you acknowledge where it comes from. See the sample page.) Choose your own video recorded using your smartphone if possible. If you download a video online, make sure that it is not copyright-protected. If you must download copyrighted music/video, just include less than 10% of the original.
- (20%) For the second part, we are going to create a slideshow with a
Facebook button. Read
part2-js.txtfile carefully; it provides all the instructions how to modifypart2.html. You need to create a slideshow of your personal photos. Resize each image to exactly 800 by 600 pixels. You can use as many images as you like. - (20%) For the third part, you are going to prepare and publish
another HTML document that uses Google Maps. Read
part3-js.txtfile carefully. Follow the instructions how on to modifypart3.html, which contains several Google maps. You need to search a few points of interests within BC (e.g., Vancouver, Victoria, UVic, etc.) - (40%) Finally, you are going to revise your part (2) of lab 1 so that it has features that you learned in part 1, 2 and 3 of this lab 2. That is, you must include a Facebook button, a slideshow, MP3 audio and hyperlinks to Google Maps.
Part 1 (20%)
Part (1) is designed to show you how to add audio/video inside a simple HTML document.
You will modify the part1.html content and its images/audio/video to
write a short story about your favorite
hobby/pet/event/activity/concert. You may use any images/audio/video as
long as they are not
copyright-protected. Please use your own images/video if possible. For
MP3 audio, please look for free MP3 music files online, e.g.,
www.mp3juices.cc and include a hyperlink to
the source where you find your MP3 file.
For this part, please keep your video file size under 10 MB (MegaBytes) maximum. If your video is bigger than this, then you need to resize it using Miro Video Convertor, iMovie, or trim it using Apple QuickTime. If you have Windows 10* you can trim your file by opening it in the pre-installed Photos App and click on Edit & Create, then Trim. If you have older versions of Windows you might be able to use Microsoft Movie Maker.
In addition, there should be one MP3 audio and one MP4 video file embedded in this HTML document. They can be added inside a HTML5 document as long as they use the appropriate tags, i.e., <audio> </audio> and <video> </video>.
(Note: <audio> and <video> tags belong to HTML5 standard. So, they only work inside the latest browsers.)
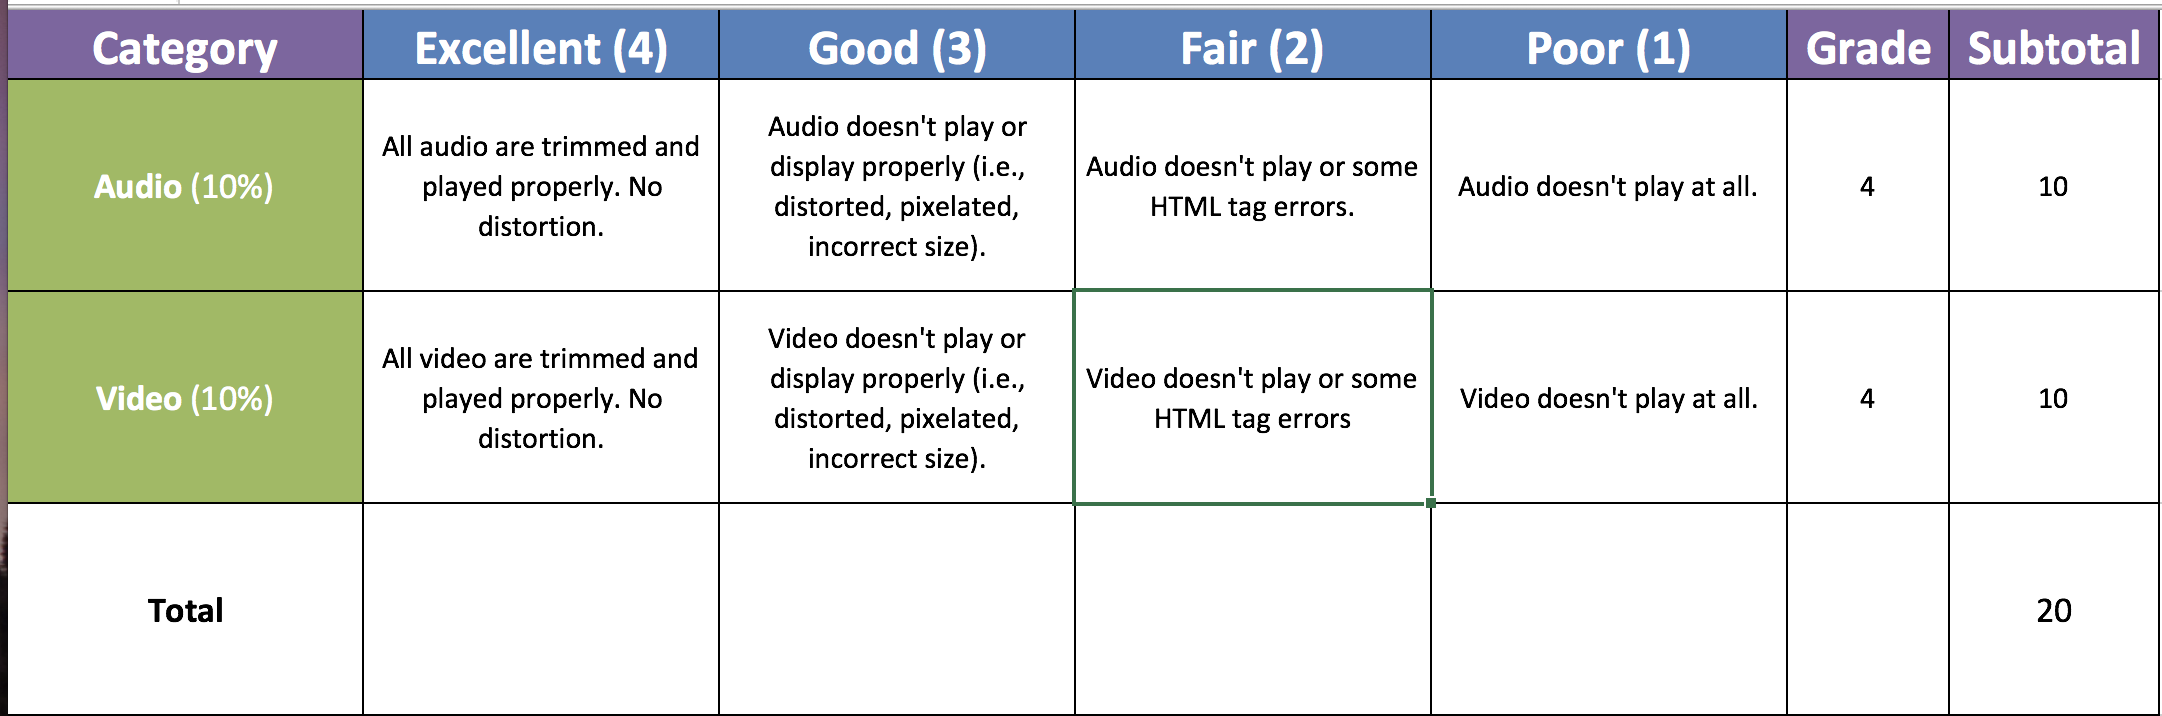
Your part 1 will be evaluated based on the following rubric.
Part 2 (20%)
This part is
designed to teach you how to create a slideshow and embed a Facebook
button. Please read the file part2-js.txt for the
instructions how to complete this part. You can use as many images as
you like in your slideshow (but at least 4 images). Please use your own
images. You must resize each image to 800 by 600 pixels. The JavaScript
and our slideshow container are defined for this size. You can change it
if you study the instructions and JavaScript carefully.
When you use Facebook Button Configuration, after you click Get Code, choose the Iframe version. Then,
cut and paste the <iframe> ... </iframe> into your HTML file.
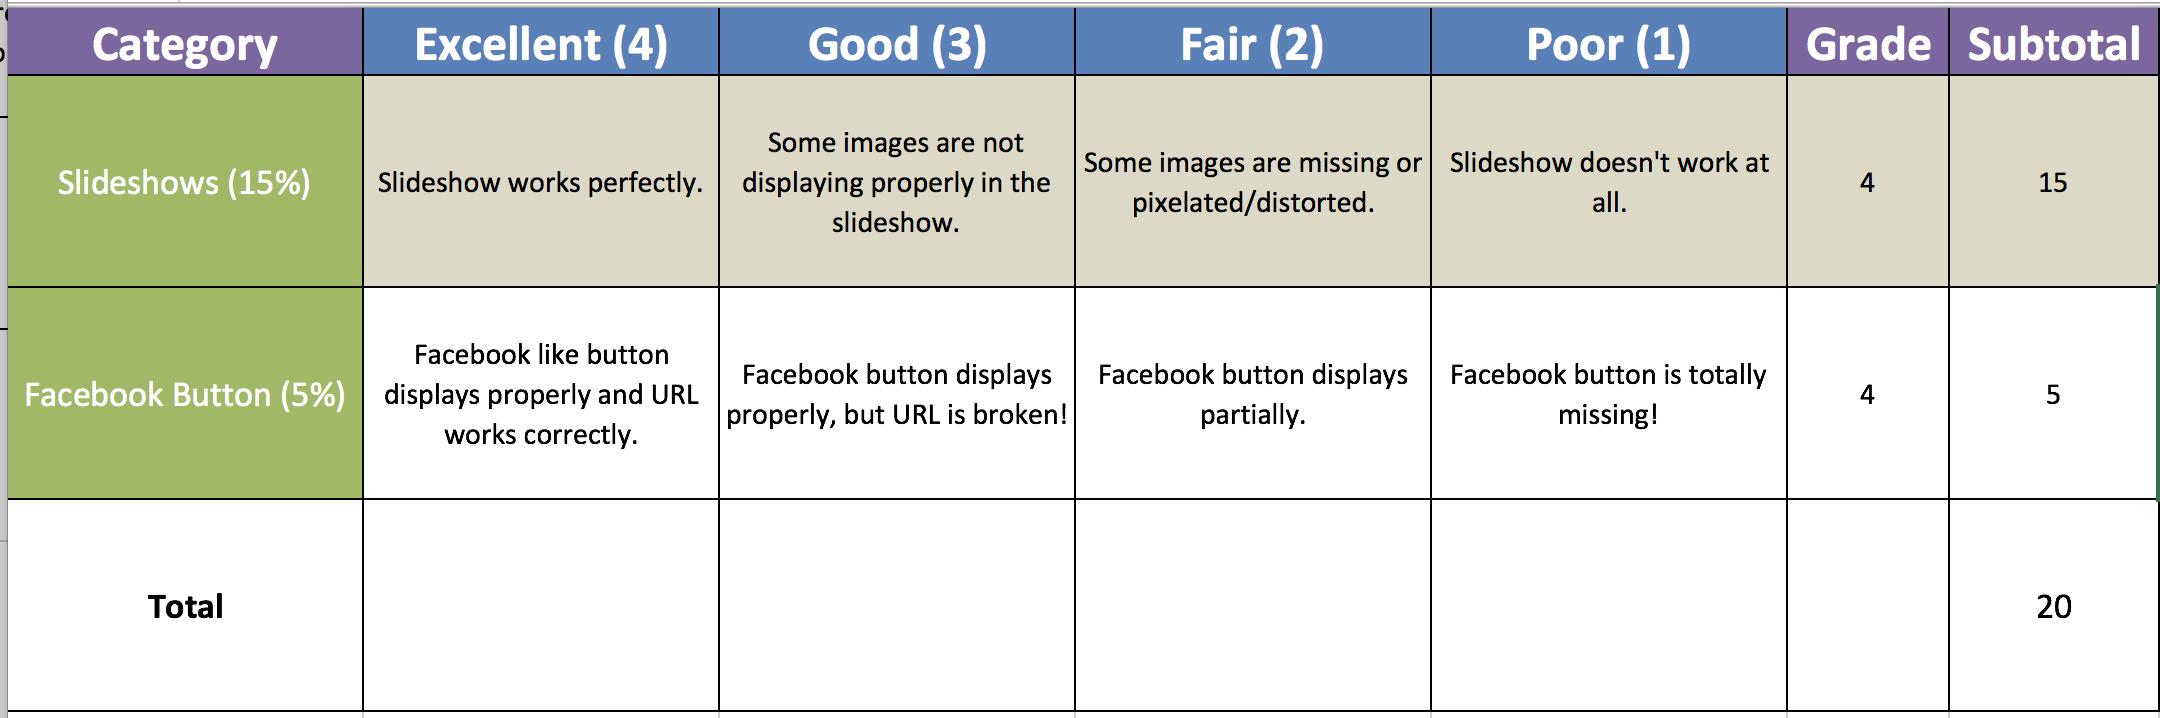
Your part 2 will be evaluated based on the following rubric.
Part 3 (20%)
This part is
designed to teach how to embedded a map and markers in Google Map. Study
the file part3-js.txt file carefully. It provides all
instructions on how to complete this part by modifying the "part3.html"
file.
This online video explains how to create an embedded Google Map.
This is the direct link to create your map.
You also need to add a few (at least two) Points Of Interests near downtown Vancouver/Victoria so that when a user clicks on the link, it will take its user to the Google Map location of that point of interest.
When you are done with this part, just publish it and test it.
In your file for part 3 you must include at least the following:
- One embedded <iframe> Google map with zero or one marker (approx. 640px by 480px), and
- A list of two points of interest, which are hyperlinked to Google Maps when clicked.
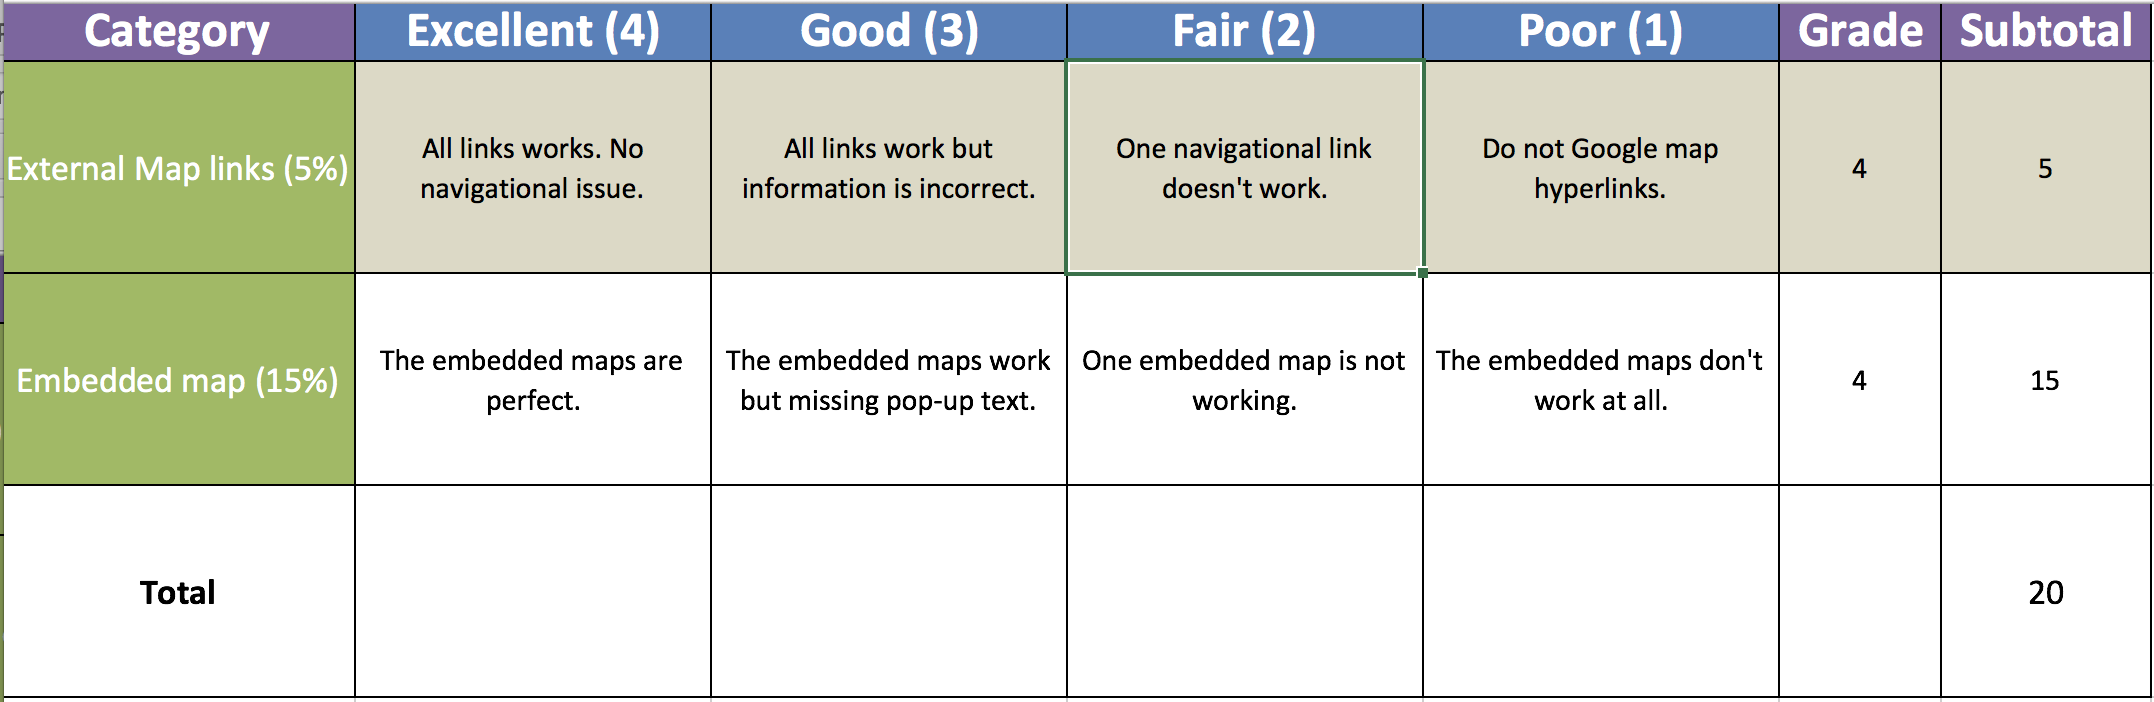
Your part 3 will be evaluated based on the following rubric.
Part 4 (40%)
It is essentially a revised version of your lab 1 part 2. Basically, we want you to add 4 large images (1000px by 400px each) on the main index page as a slideshow, a Facebook-like button on one of the page, a hyperlink to a Google Map on every page, and one MP3 music with controls on the main Index page. When you are done with this part, just publish it and test it again.
To get started on part 4, you should make a copy of your working part 2
of lab1 inside the lab2 folder. It is easier to copy the entire old
lab1 folder into lab2 folder. (Note: If you have made some changes to your style.css
in lab1, make sure that you copy it as well.)
UPDATE: As some of you worked on super heroes you could use any pictures for lab 2 Part 4. Under fair dealing, students could display some percentage copyrighted image in their assignments for educational purposes. The recommended practice is to Include the source of your pictures.
Just follow these steps:
- The file
part4.htmlcontains partially solution that you can analyze; - go to your
lab1folder which contains a working copy of your old lab1, select all files (command-Ain OS X, orctrl-Ain Windows); - copy all
lab1files (command-Cin OS X,ctrl-Cin Windows); - now, go to
lab2folder, paste all files fromlab1folder intolab2(command-Vin OS X,ctrl-Vin Windows); - it will ask you whether you want to overwrite all files with the
same name in
lab2, chooseYes to All.
Now, you should have a working copy of your lab 1 part 2 inside your
lab2 folder. To make sure that it is the case, just double-click your
lab 1 part 2 index.html file. If it doesn't work, then you have missed
some files from lab1 folder. Repeat the above steps again. (Note: Several old files from part 1 of
lab 1 will also be copied. It is not an issue because we do not use it.
You can safely delete them inside lab2 folder if you wish. They will not
cause any problem if you just leave them. You may also copy the
style.css from lab1 folder into lab2 folder. This is fine!)
(Important: If you have lost some marks in lab 1, then please correct those mistakes before you start this part. So, you will not lose marks again in lab 2.)
Part 4 should include at least the following features after modifying your part 2 from lab 1:
- at least 4 large images (1000px by 400px each) on the main page as a slideshow,
- one Facebook Like button (which must link to your published website of this part) in the main page,
- one hyperlink to a Google Map on every page (not an embedded Google map, just a link to a Google Map), and
- one MP3 embedded in the main Index page (note: don't autoplay, just a simple controls.),
UPDATE: As some of you worked on super heroes the map could be any place.
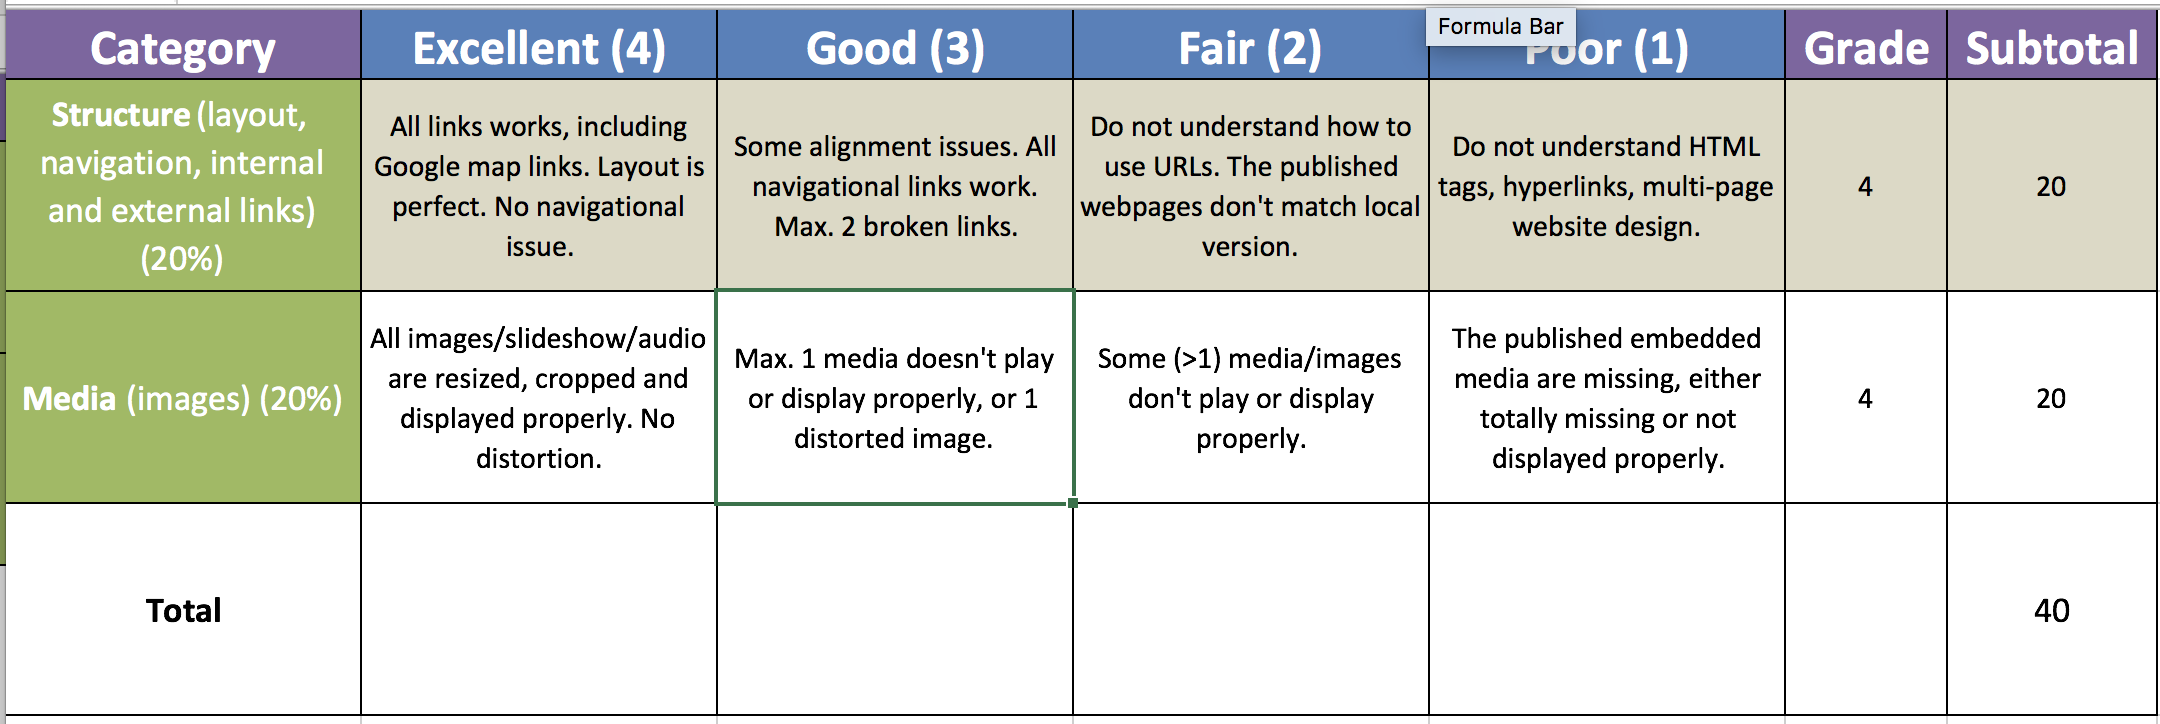
Your part 4 will be evaluated based on the following rubric.
External HTML References
- The W3C School on HTML5 video
- The W3C School on HTML5 audio
- How To Add Facebook Like Button
- Facebook Like-Button Configurator
- Google Maps
How to Submit Your Lab
Complete and publish all four parts using your NetlinkID account on
studentweb.uvic.ca.
Login to Connex. Select CSC 100 Tab from the top. Choose Labs & Project from the side bar. Click "Lab 2". Follow the instructions
here.
In the Submission text box underneath the instructions, for example,
you just enter the following information:
- Part 1: https://studentweb.uvic.ca/~olgagould/lab2/part1.html
- Part 2: https://studentweb.uvic.ca/~olgagould/lab2/part2.html
- Part 3: https://studentweb.uvic.ca/~olgagould/lab2/part3.html
- Part 4: https://studentweb.uvic.ca/~olgagould/lab2/index.html
Replace the Part 1, Part 2, Part 3 and Part 4 accordingly. Then, click Submit.
That is it! You are done. You may update/modify your website as many times as you like before the due date. You do not need to submit again if you only change the content of your published websites.